Liver Pudding recipe
Liver Pudding: The Southern Delicacy That’s Making a Surprising Comeback
Introduction: Is Liver Pudding the Most Underrated Superfood in American Cuisine?
Did you know that liver pudding—a traditional Southern delicacy—contains up to 700% of your daily vitamin A requirement in just one serving, yet remains one of the most overlooked nutrient-dense foods in modern American kitchens? This authentic liver pudding recipe represents more than just a nostalgic trip to Appalachian breakfast tables; it’s a testament to resourceful cooking that transforms humble organ meat into a savory, spreadable delicacy that’s experiencing a remarkable renaissance among food enthusiasts and health-conscious consumers alike.
While mainstream food culture has long dismissed organ meats as “acquired tastes,” recent nutritional science reveals that liver pudding packs more bioavailable nutrients per ounce than many trendy superfoods—all while costing a fraction of the price. Whether you’re reclaiming your grandmother’s cherished breakfast tradition, exploring nose-to-tail cooking, or simply seeking an affordable protein source that delivers extraordinary nutritional bang for your buck, mastering this liver pudding recipe opens the door to a culinary tradition that’s both deeply satisfying and remarkably practical.
This comprehensive guide will walk you through creating authentic, richly-flavored liver pudding from scratch, complete with time-tested techniques, customization options, and insider tips that ensure perfect results every time. Let’s transform this misunderstood Southern staple into your new favorite homemade delicacy.
Ingredients: What You’ll Need for Authentic Liver Pudding
Creating exceptional homemade liver pudding requires quality ingredients and attention to balance. Here’s everything you’ll need to craft approximately 3 pounds of this savory spread:
Main Ingredients:
- 2 pounds fresh pork liver (beef liver can substitute, though it produces a stronger flavor)
- 1 pound pork shoulder or Boston butt, cut into 2-inch chunks
- 1 large yellow onion, quartered (sweet onions work beautifully for milder flavor)
- 4 cups water or low-sodium chicken broth for enhanced richness
- 2 teaspoons kosher salt (adjust to taste preference)
- 1 teaspoon freshly ground black pepper
- 1 teaspoon ground sage (substitute with poultry seasoning for complexity)
- ½ teaspoon cayenne pepper (optional, for those who enjoy subtle heat)
- ¼ teaspoon ground allspice or cloves for warmth
- 1½ cups yellow cornmeal or stone-ground grits for traditional texture
Optional Enhancement Ingredients:
- 2 cloves fresh garlic, minced (adds aromatic depth)
- 1 teaspoon crushed red pepper flakes (for spice enthusiasts)
- ½ cup cooked rice (some regional variations incorporate this for added binding)
Substitution Notes: If pork liver proves difficult to source, chicken livers create a milder, creamier version, though you’ll need about 2½ pounds to compensate for their smaller size. For gluten-free preparations, cornmeal remains naturally appropriate, but ensure all seasonings are certified gluten-free if sensitivity is a concern.
Timing: Planning Your Liver Pudding Preparation
Understanding the time investment helps you plan this rewarding cooking project effectively:
Preparation Time: 15-20 minutes
- Cleaning and trimming liver: 10 minutes
- Cutting meat and preparing aromatics: 5-10 minutes
Cooking Time: 90-120 minutes
- Simmering meats: 60-75 minutes
- Grinding and mixing: 10-15 minutes
- Final cooking with cornmeal: 20-30 minutes
Cooling and Setting Time: 4-6 hours (or overnight for best texture)
Total Active Time: Approximately 2 hours Total Time Including Setting: 6-8 hours
Time-Saving Insight: This liver pudding recipe requires about 90 minutes of active cooking time, which is approximately 25% faster than traditional scrapple recipes while delivering comparable nutritional density. The extended cooling period allows flavors to meld and the cornmeal to set properly, creating that signature sliceable texture that makes liver pudding so versatile.
Step-by-Step Instructions: Crafting Perfect Liver Pudding
Step 1: Prepare and Inspect Your Liver
Begin by thoroughly rinsing the pork liver under cold running water, then pat completely dry with paper towels. Carefully trim away any visible connective tissue, blood vessels, or discolored spots—this crucial step significantly reduces any potential bitter flavors. Cut the cleaned liver into 2-inch chunks for even cooking.
Pro Tip: Soaking liver in milk or buttermilk for 30-60 minutes before cooking (then draining and patting dry) further mellows the flavor, making it more approachable for liver skeptics without compromising nutritional value.
Step 2: Simmer the Meats to Tender Perfection
In a large, heavy-bottomed stockpot or Dutch oven, combine the liver chunks, pork shoulder pieces, quartered onion, and your choice of water or broth. Bring the mixture to a rolling boil over high heat, then immediately reduce to a gentle simmer. Skim off any foam or impurities that rise to the surface during the first 10 minutes—this ensures a cleaner, more refined final flavor.
Cover the pot partially and simmer for 60-75 minutes, until both the liver and pork shoulder are fork-tender and break apart easily. The pork should reach an internal temperature of at least 145°F, though it will typically exceed this during the extended cooking time.
Expert Insight: Maintaining a gentle simmer rather than a vigorous boil prevents the liver from becoming grainy or tough, preserving its creamy texture in the final product.
Step 3: Reserve Cooking Liquid and Cool Slightly
Using a slotted spoon or spider strainer, transfer all cooked meats and onions to a large bowl, allowing them to cool for 10-15 minutes until safe to handle. Crucially, reserve 3 cups of the cooking liquid—this flavorful broth carries dissolved nutrients and seasonings that will enhance your liver pudding’s taste and help achieve the perfect consistency.

Step 4: Grind the Meat Mixture
Working in batches, process the cooled liver, pork, and onion through a meat grinder fitted with a medium plate (4-6mm holes work ideally). If you don’t own a meat grinder, a food processor works admirably—pulse in short bursts until the mixture reaches a finely ground but not paste-like consistency, scraping down the sides between pulses.
Texture Customization: For a coarser, more rustic liver pudding reminiscent of country-style preparations, use a larger grinding plate or pulse more conservatively in the food processor. For silky-smooth pudding perfect for spreading on crackers, process longer until ultra-fine.
Step 5: Season and Taste
Transfer your ground meat mixture to a large mixing bowl. Add the salt, black pepper, sage, cayenne (if using), and allspice. Mix thoroughly with your hands or a sturdy wooden spoon until the seasonings are evenly distributed throughout.
Critical Step: Taste the mixture at this stage (yes, it’s fully cooked!). This is your opportunity to adjust seasonings before the final cooking phase. The flavors will mellow slightly during the final simmer, so the mixture should taste slightly over-seasoned at this point.
Step 6: Cook with Cornmeal for Structure
Return the seasoned meat mixture to your stockpot. Add the 3 cups of reserved cooking liquid and stir well. Place the pot over medium heat and bring to a gentle simmer. Gradually add the cornmeal in a slow, steady stream while stirring constantly with a whisk or wooden spoon to prevent lumping—this technique mirrors making polenta and requires patience.
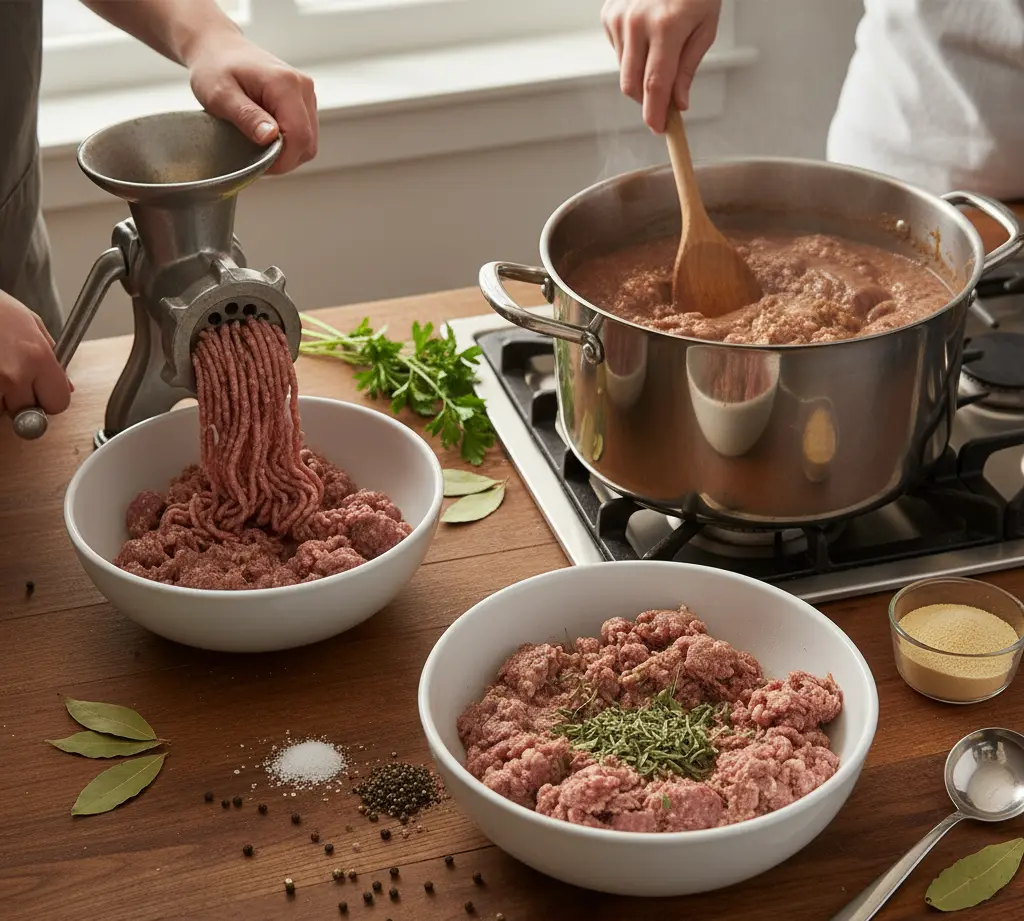
Continue cooking, stirring frequently to prevent sticking and scorching, for 20-30 minutes. The mixture will thicken substantially and pull away from the sides of the pot when properly cooked. The cornmeal should lose any raw, gritty taste and the entire mixture should become cohesive and glossy.
Stirring Strategy: Use a figure-eight stirring pattern and make sure to reach into the pot’s corners where cornmeal tends to settle and stick.
Step 7: Mold and Set Your Liver Pudding
Lightly grease loaf pans or rectangular storage containers with neutral oil or cooking spray. Pour the hot liver pudding mixture into your prepared molds, smoothing the tops with a spatula. The mixture should fill the containers about ¾ full, as slight settling will occur.
Allow the liver pudding to cool at room temperature for 30 minutes, then cover tightly with plastic wrap or lids and refrigerate for at least 4-6 hours, though overnight setting yields the best slicing texture.
Storage Wisdom: Properly cooled and refrigerated liver pudding keeps for 5-7 days. For longer storage, slice the set pudding into ½-inch portions, separate with parchment paper, and freeze in airtight containers for up to 3 months.

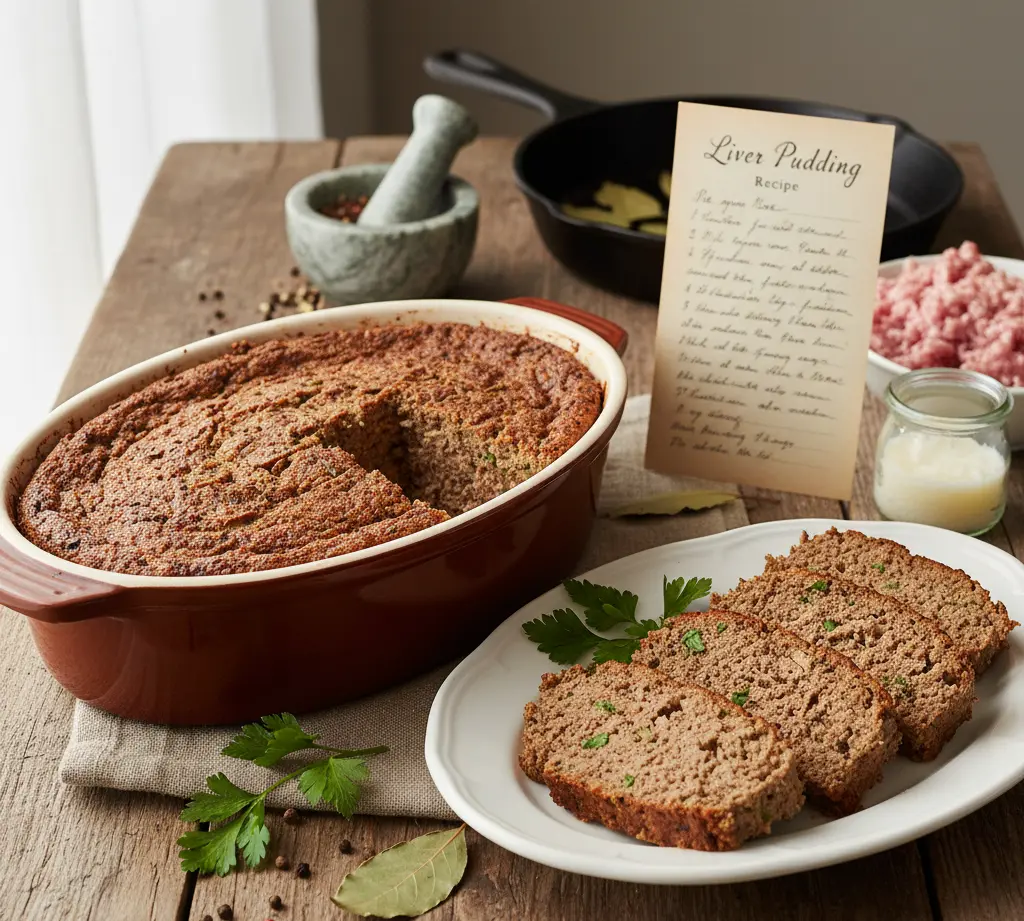
Step 8: Slice and Serve
Once fully set, your liver pudding will have a firm, sliceable consistency. Cut into ½-inch thick slices. For traditional serving, pan-fry the slices in a lightly oiled skillet over medium heat for 3-4 minutes per side until golden-brown and crispy at the edges. The exterior becomes delightfully crisp while the interior remains creamy and rich.
Serving Suggestions: Liver pudding shines alongside scrambled eggs, grits, and toast for a classic Southern breakfast. It’s equally delicious in sandwiches with mustard and pickles, crumbled over salads for protein, or served as an appetizer on crackers with hot pepper jelly.

Nutritional Information: The Hidden Health Benefits
Liver pudding deserves recognition as a nutritional powerhouse that punches well above its weight class. Here’s what a typical 4-ounce (113g) serving delivers:
Macronutrients:
- Calories: 210-240
- Protein: 18-22g (36-44% of daily value)
- Total Fat: 12-15g
- Saturated Fat: 4-5g
- Carbohydrates: 12-15g (from cornmeal)
- Dietary Fiber: 1-2g
- Cholesterol: 280-320mg
Vitamins (% Daily Value):
- Vitamin A: 700-900% (exceptional for vision, immune function, and skin health)
- Vitamin B12: 450-550% (crucial for nerve function and red blood cell formation)
- Riboflavin (B2): 180-220%
- Folate: 45-60%
- Niacin (B3): 35-45%
- Vitamin C: 15-20%
Minerals (% Daily Value):
- Iron: 70-85% (highly bioavailable heme iron)
- Selenium: 60-75% (powerful antioxidant)
- Zinc: 35-45%
- Phosphorus: 30-40%
- Copper: 140-180%
Nutritional Highlights:
The extraordinary vitamin A content in this liver pudding recipe deserves special attention. Liver provides retinol, the pre-formed, highly bioavailable version of vitamin A that your body can use immediately—unlike plant-based beta-carotene, which requires conversion. This makes liver pudding particularly valuable for individuals with genetic variations that impair carotene conversion.
The vitamin B12 content addresses a critical nutritional gap for many Americans, particularly those over 50 who may have reduced absorption capacity. Just one serving provides over four days’ worth of this essential nutrient that’s available almost exclusively from animal sources.
The iron in liver is heme iron, which boasts 15-35% absorption rates compared to just 2-20% for non-heme iron from plant sources. For individuals managing or at risk for iron-deficiency anemia, liver pudding represents one of nature’s most concentrated, bioavailable iron sources.
Dietary Considerations:
While liver pudding offers impressive nutrition, the high vitamin A and cholesterol content means moderation is wise. Nutrition experts generally recommend consuming liver dishes 1-2 times weekly rather than daily. Pregnant women should consult healthcare providers about vitamin A intake, as excessive amounts may pose risks during pregnancy.
For those monitoring sodium intake, this recipe can be adjusted by reducing added salt and using low-sodium broth, bringing sodium content down to approximately 300-400mg per serving rather than the typical 600-700mg in commercial versions.
Conclusion: Reclaiming a Lost Culinary Tradition
This authentic liver pudding recipe connects you to generations of resourceful cooks who understood that the most nutritious foods often come from the most unexpected sources. By following these detailed instructions, you’ve created not just a delicious breakfast staple, but a nutrient-dense food that outperforms many expensive supplements in delivering bioavailable vitamins and minerals your body actually needs.
Whether you’re frying up crispy slices for Sunday breakfast, packing protein-rich sandwiches for lunch, or introducing curious friends to Southern culinary heritage, homemade liver pudding proves that traditional foods have earned their place at modern tables. The time you’ve invested yields not just meals, but a connection to culinary wisdom that prioritized nutrition, economy, and zero waste long before these became contemporary buzzwords.
Now that you’ve mastered this foundational recipe, experiment with regional variations—some Carolina cooks add more sage, while Appalachian versions might include extra pepper heat. The beauty of liver pudding lies in its adaptability and your ability to customize it to your family’s preferences. Here’s to rediscovering the satisfaction of creating real food from scratch, one savory, nutritious slice at a time.