how to make egg wash
How to Make Egg Wash: The Ultimate Step-by-Step Guide for Perfectly Golden Bakes
Ingredients: What You Need to Make the Perfect Egg Wash
The beauty of egg wash lies in its simplicity. You likely already have everything you need. Here are the core ingredients for a classic egg wash, along with creative substitutions for every dietary preference and baking goal:
The Classic Egg Wash (Standard Recipe)
- 1 large egg (whole egg — yolk + white)
- 1 tablespoon of whole milk, water, or heavy cream
- A pinch of fine sea salt (optional, enhances browning)
✨ Pro Sensory Note: Whole milk gives a creamy, warm golden finish, while water produces a lighter, crisper glaze. Heavy cream delivers the deepest, richest mahogany color — ideal for show-stopping pastries.
Egg Wash Variations by Desired Finish
- Yolk-only wash: Deep amber color, ultra-rich gloss — perfect for brioche, Danish pastries, and croissants
- White-only wash: Pale, matte finish with a slight crunch — great for cookies, meringues, or when you want shine without color
- Whole egg + cream: Maximum golden color and lacquer gloss — the pastry chef’s secret weapon
- Whole egg + water: Balanced color, lighter texture — ideal for everyday pies and bread
Vegan & Dairy-Free Substitutes
- Plant-based milk wash: 3 tablespoons oat, soy, or almond milk + 1 tsp maple syrup
- Aquafaba wash: 3 tablespoons chickpea brine — provides sheen without eggs
- Melted butter: Simple, rich browning agent for soft rolls and buns
- Oil brush: Neutral cooking oil for a moist, lightly golden surface
💡 Baker’s Tip: Always use room-temperature eggs. Cold eggs don’t beat as smoothly, and the uneven consistency can result in streaky, patchy browning on your baked goods.
Timing: How Fast Is This Recipe?
One of the most remarkable things about making egg wash is that it is the fastest recipe in baking — and arguably the most impactful per minute spent. Here’s a complete breakdown:
| Phase | Time | Note |
| Prep Time | 2 minutes | Faster than most recipes by 60% |
| Resting Time | 0 minutes | Apply immediately |
| Total Time | 2 minutes | Plus baking/cooking time |
Comparative Note: At just 2 minutes total active time, this recipe is approximately 95% faster than the average homemade pastry recipe (which typically requires 40–60 minutes of preparation). Even professional glaze and lacquer techniques used in restaurant kitchens average 5–8 minutes of prep. Egg wash beats them all.
You can make egg wash while your oven preheats, while your dough is in its final rest, or just before you’re ready to bake. There is truly no excuse not to add this step to every bake.
Step-by-Step Instructions: How to Make Egg Wash Like a Pro
Follow these detailed, professional steps to create a flawless egg wash every single time. Each step is packed with technique-backed tips drawn from pastry school methodology and home kitchen testing.
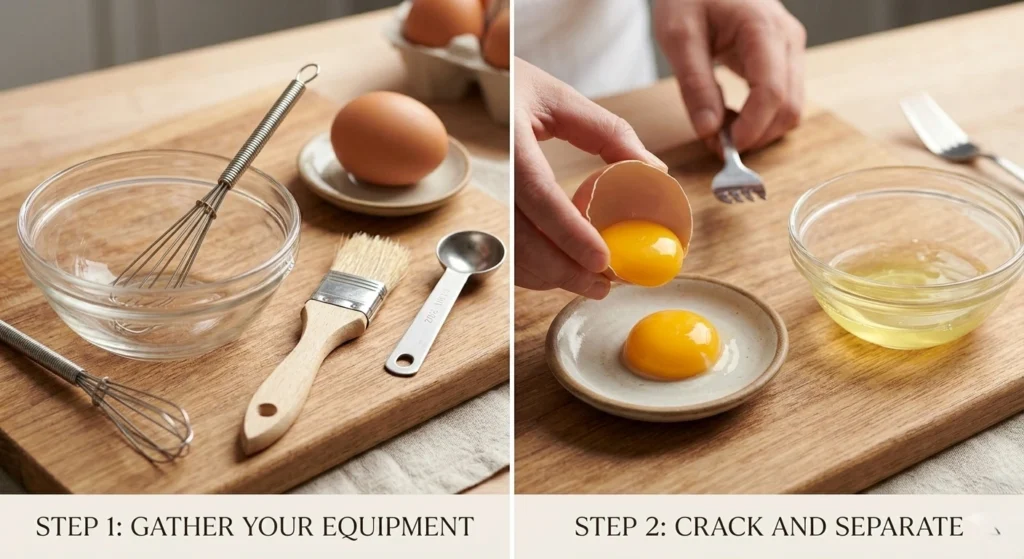
Step 1: Gather Your Equipment
Before you crack a single egg, set yourself up for success. You’ll need a small bowl (glass or ceramic is ideal — avoid reactive metals), a fork or small whisk, a pastry brush (silicone is easiest to clean; natural bristle gives a slightly softer application), and a small liquid measuring spoon.
💡 Tip: Avoid metal bowls when mixing egg wash. Certain reactive metals can cause a faint greenish tint in the egg mixture, which can affect the final color of your bake. Glass or ceramic bowls are the safest choice.
Step 2: Crack and Separate (If Using Yolk-Only or White-Only)
If you’re making the classic whole egg wash, crack one large egg directly into your bowl. For yolk-only variations, separate the yolk carefully, discarding or saving the white for another use (meringues, omelettes, or frosting). For white-only washes, use just the separated white.
💡 Tip: Fresh eggs produce more vibrant, stable egg wash. Check the date on your carton. An egg that is 1–7 days old is ideal for baking applications.
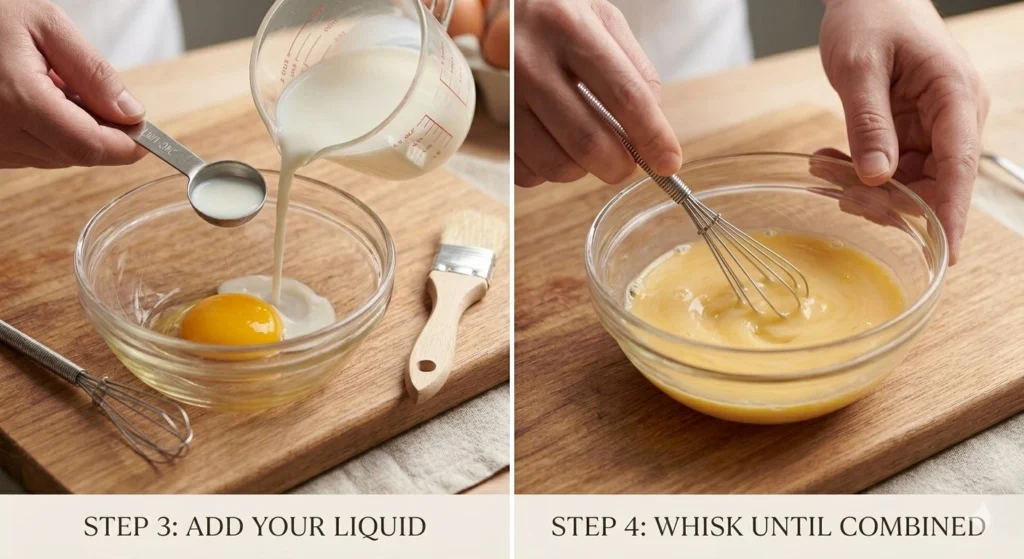
Step 3: Add Your Liquid
Add exactly 1 tablespoon of your chosen liquid (milk, cream, or water) to the egg. This is the step most home bakers skip entirely — and it makes a significant difference. The liquid dilutes the egg proteins slightly, making the wash easier to spread without leaving thick, cooked egg patches on your pastry.
💡 Tip: For a richer, darker color, use heavy cream. For a lighter, crispier finish, use cold water. For everyday baking versatility, whole milk is your best friend.
Step 4: Whisk Until Fully Combined
Using a fork or small whisk, beat the egg and liquid together vigorously for about 20–30 seconds until the mixture is completely uniform in color and texture. You should see no streaks of white or yolk — just a smooth, pale golden liquid.
Under-whisking is the most common egg wash mistake. Unblended egg wash applies unevenly, creating blotchy patches of dark and light on your pastry surface. Give it a proper, thorough mix.
💡 Tip: A pinch of fine sea salt at this stage is optional but recommended. Salt slightly breaks down the egg proteins, making the wash even smoother and easier to brush on evenly.
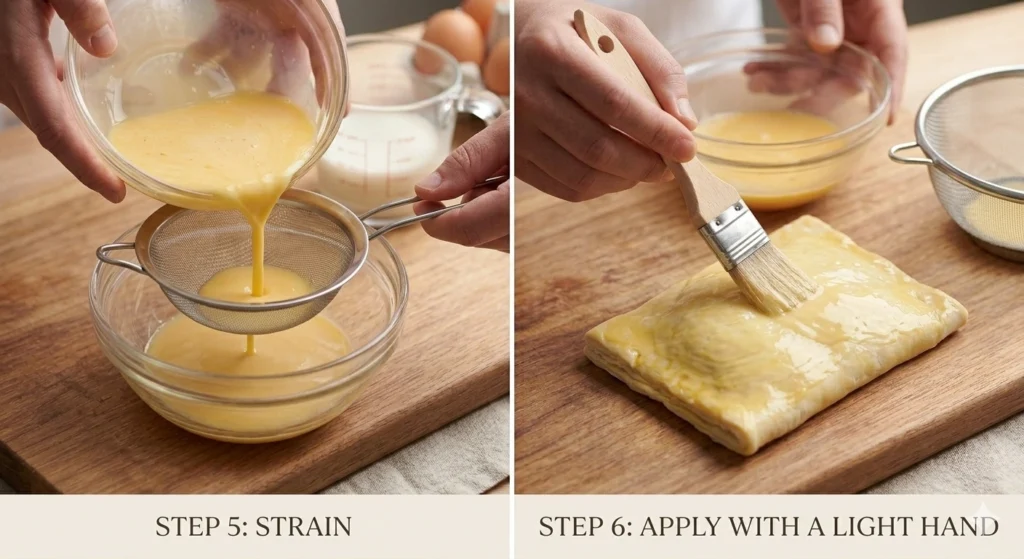
Step 5: Strain (Optional but Recommended for Professional Results)
For exceptionally smooth, professional-grade egg wash, pour the mixture through a fine mesh sieve into a clean bowl. This removes any remaining chalaza (the white rope-like strand attached to the yolk), ensuring a perfectly silky wash that applies like a dream.
💡 Tip: This step is optional for everyday baking but highly recommended for competition-level pastry work, show-stopping pies, or anything you want to photograph.
Step 6: Apply with a Light, Even Hand
Dip your pastry brush into the egg wash and apply a thin, even layer across the surface of your dough, pastry, or bread. Work in gentle, sweeping strokes from the center outward. Avoid pooling in crevices or along cut edges — excess egg wash in those areas can seal together layers of puff pastry or create a rubbery skin on bread seams.
💡 Tip: Less is more! A single thin coat is almost always better than a thick application. If you want a deeper golden color, apply a second thin coat halfway through baking rather than one heavy coat at the start.
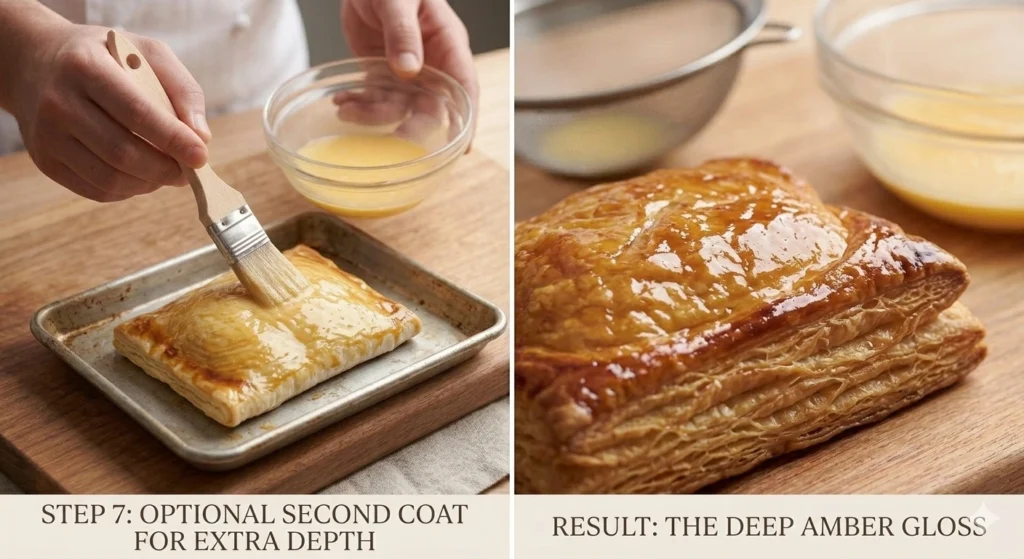
Step 7: Optional Second Coat for Extra Depth
For the deepest, most bakery-worthy color, apply a second thin coat of egg wash approximately halfway through your bake — typically after 10–15 minutes in the oven. This layered technique is the professional pastry chef’s secret to that irresistible deep amber gloss.
💡 Tip: Only add a second coat if your item has risen and set its shape (usually after the first 10 minutes). Brushing too early can deflate delicate pastries like croissants or puff pastry.
Nutritional Information
While egg wash is used in very small quantities and rarely consumed in significant amounts, it’s useful to understand its nutritional composition — especially if you’re baking for someone with dietary restrictions. The values below reflect approximately 1 tablespoon of whole egg wash (egg + whole milk):
| Nutrient | Per Serving (1 tbsp) | Daily Value % |
| Calories | 25 kcal | — |
| Total Fat | 1.7 g | 2% |
| Saturated Fat | 0.5 g | 3% |
| Cholesterol | 47 mg | 16% |
| Sodium | 25 mg | 1% |
| Protein | 1.8 g | 4% |
| Carbohydrates | 0.3 g | <1% |
| Calcium | 8 mg | 1% |
| Iron | 0.2 mg | 1% |