How to Make Almond Milk
How to Make Almond Milk at Home
Ingredients for Homemade Almond Milk
This recipe yields approximately 4 cups (about 1 liter) of fresh almond milk. The ingredient list is beautifully minimal — proof that the best things really are simple.
Core Ingredients
- 1 cup (143g) raw almonds, soaked overnight (or at least 8 hours)
- 4 cups (960ml) filtered cold water
- 1 pinch of fine sea salt (enhances the natural sweetness)
Optional Flavor Enhancers
- 1–2 Medjool dates, pitted (natural sweetener — adds a rich, caramel-like sweetness)
- 1 teaspoon pure vanilla extract (for a warm, aromatic depth)
- 1 tablespoon raw honey or pure maple syrup (for a delicate floral or earthy sweetness)
- 1/4 teaspoon ground cinnamon (adds a cozy, spiced warmth)
Smart Substitutions
- No raw almonds? Use blanched almonds for a lighter color and milder flavor.
- Want creamier milk? Reduce water to 3 cups for a barista-style, full-fat version.
- Nut allergy in the household? Try this exact method with raw cashews or macadamia nuts.
- Skip soaking? Use 1 cup of raw almond butter blended with 4 cups water — instant almond milk with no straining required.
Equipment you’ll need:
- High-speed blender (Vitamix, Blendtec, or a powerful personal blender)
- Nut milk bag or fine-mesh cheesecloth
- Large mixing bowl or pitcher
- Glass storage jar (32 oz / 1 liter)
Timing Overview
One of the most appealing aspects of making almond milk at home is how little active effort it requires. Here’s a quick breakdown:
| Stage | Time |
| Soaking time (hands-off) | 8–12 hours (overnight) |
| Active prep time | 5 minutes |
| Blending time | 2 minutes |
| Straining time | 3 minutes |
| Total active time | 10 minutes |
| Total time (incl. soaking) | ~9 hours |
The active hands-on work takes just 10 minutes — that’s approximately 85% less effort than baking a typical loaf of bread, and the result is a fresh, preservative-free product that lasts up to 5 days in the refrigerator. Set the almonds to soak before bed, and you’ll have fresh milk ready by morning.
Step-by-Step Instructions: How to Make Almond Milk
Follow these steps carefully and you’ll produce consistently creamy, smooth almond milk every single time. Each step is designed to maximize flavor extraction and minimize waste.
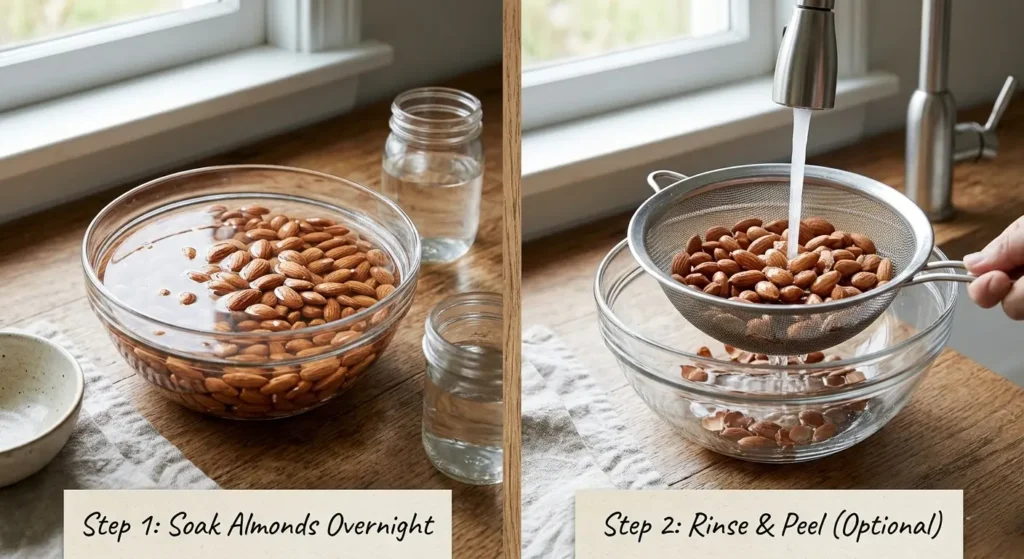
Step 1: Soak Your Almonds
Place 1 cup of raw almonds in a medium bowl and cover with at least 2 inches of cold water. Allow them to soak for a minimum of 8 hours, ideally overnight (up to 12 hours). This step is non-negotiable for the best results.
Why does soaking matter so much? Raw almonds contain enzyme inhibitors and phytic acid that can make them harder to digest and harder to blend smoothly. Soaking activates the almonds, neutralizes these compounds, and softens the cell walls — resulting in a creamier, more digestible milk with a noticeably sweeter flavor.
💡 Pro Tip: For the creamiest possible almond milk, soak in the refrigerator during warm months to prevent any fermentation. You’ll notice the almonds swell and their skins loosen — that’s exactly what you want.
Step 2: Rinse and Peel (Optional but Recommended)
Once soaked, drain the almonds through a fine-mesh sieve and rinse thoroughly under cold running water. Give the bowl a gentle shake — you’ll notice the brown skins beginning to separate. You can optionally peel each almond by pinching it between your fingers; the skin will slip off easily.
While this step is optional, removing the skins produces a whiter, smoother milk with a milder, less bitter taste. If you prefer a more robust, nutty almond flavor with a slightly beige tint, skip the peeling and proceed directly to blending.
💡 Pro Tip: Save those almond skins! They’re packed with flavonoids and antioxidants. Add them to a morning smoothie or steep them in hot water for a simple antioxidant tea.
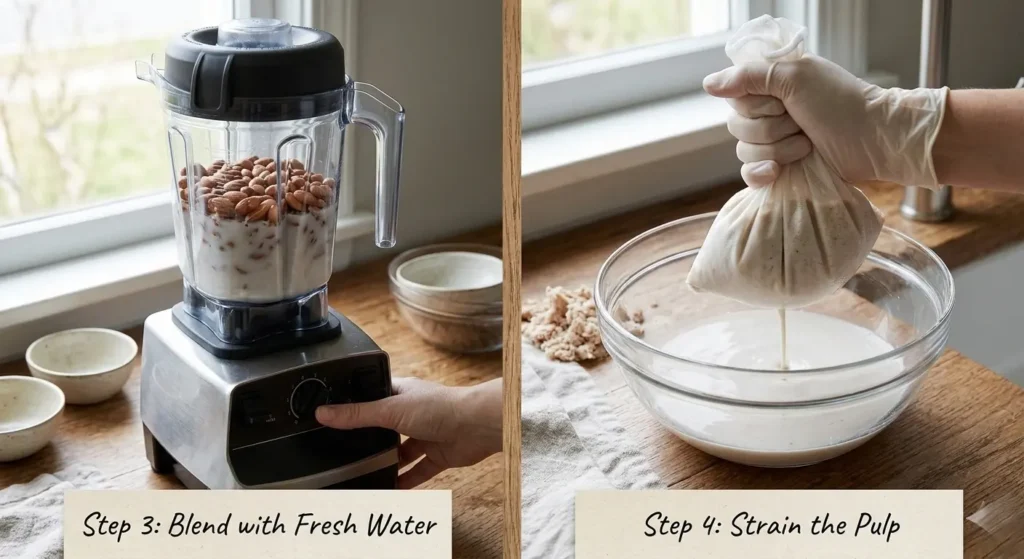
Step 3: Blend the Almonds with Cold Water
Add your drained (and optionally peeled) almonds to a high-speed blender. Pour in 4 cups of cold filtered water. If you’re adding any flavor enhancers — dates, vanilla, cinnamon, or a pinch of sea salt — add them now.
Blend on high speed for a full 90 seconds. You’re looking for a uniformly white, opaque liquid with no visible almond chunks remaining. The mixture should look and smell intensely nutty — almost milky white, with a frothy head on top.
💡 Pro Tip: Using filtered water makes a genuine difference in taste. Tap water can carry mineral flavors that subtly compete with the delicate almond flavor. Cold filtered water also helps prevent the blender motor from warming the milk during blending.
Step 4: Strain Through a Nut Milk Bag
Set a large bowl or pitcher beneath a nut milk bag or several layers of cheesecloth. Pour the blended almond mixture into the bag. Twist the top of the bag closed with one hand, then squeeze and massage firmly with the other, working from top to bottom. Keep pressing until you’ve extracted every last drop of liquid.
The pulp remaining in the bag is called almond meal or almond flour — and it’s far too valuable to discard. Set it aside for later (more on this in the substitutions and tips section below).
💡 Pro Tip: Don’t rush the straining. Slow, firm pressure extracts more milk and results in a drier, more usable pulp. Rushing produces a wetter pulp and cloudier milk.
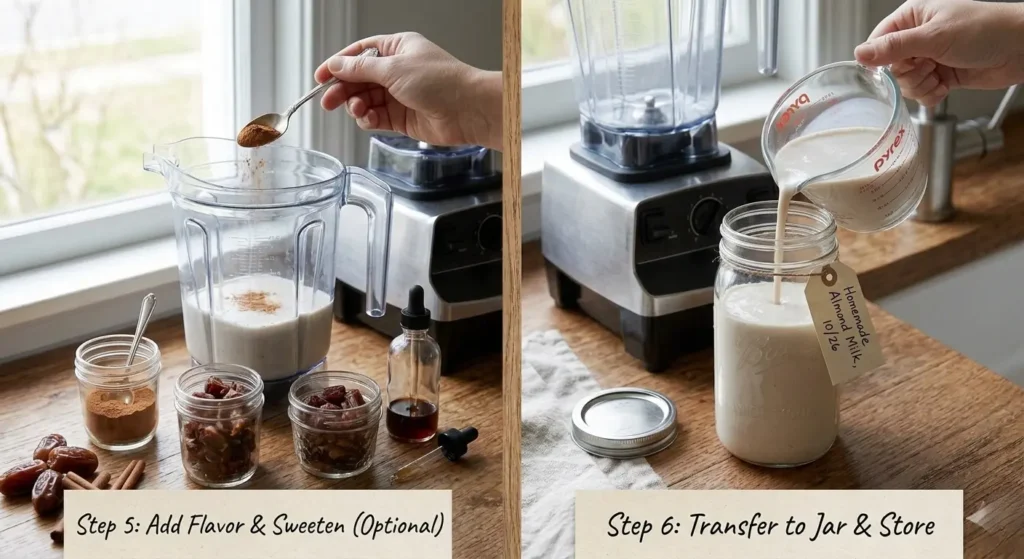
Step 5: Taste, Adjust, and Sweeten
Give your freshly strained almond milk a taste. At this point, it should be lightly sweet, pleasantly nutty, and wonderfully fresh. Now is the time to fine-tune it to your personal preference.
Want it sweeter? Blend in 1–2 pitted Medjool dates or a teaspoon of maple syrup. Want it richer? Re-blend with 1 tablespoon of almond butter. Want a hint of spice? A quarter teaspoon of ground cinnamon added back to the blender transforms this into a warming, chai-inspired drink.
💡 Pro Tip: Always re-blend after adding sweeteners rather than stirring — this ensures perfectly uniform incorporation throughout the milk without any settled sweetness at the bottom of your glass.
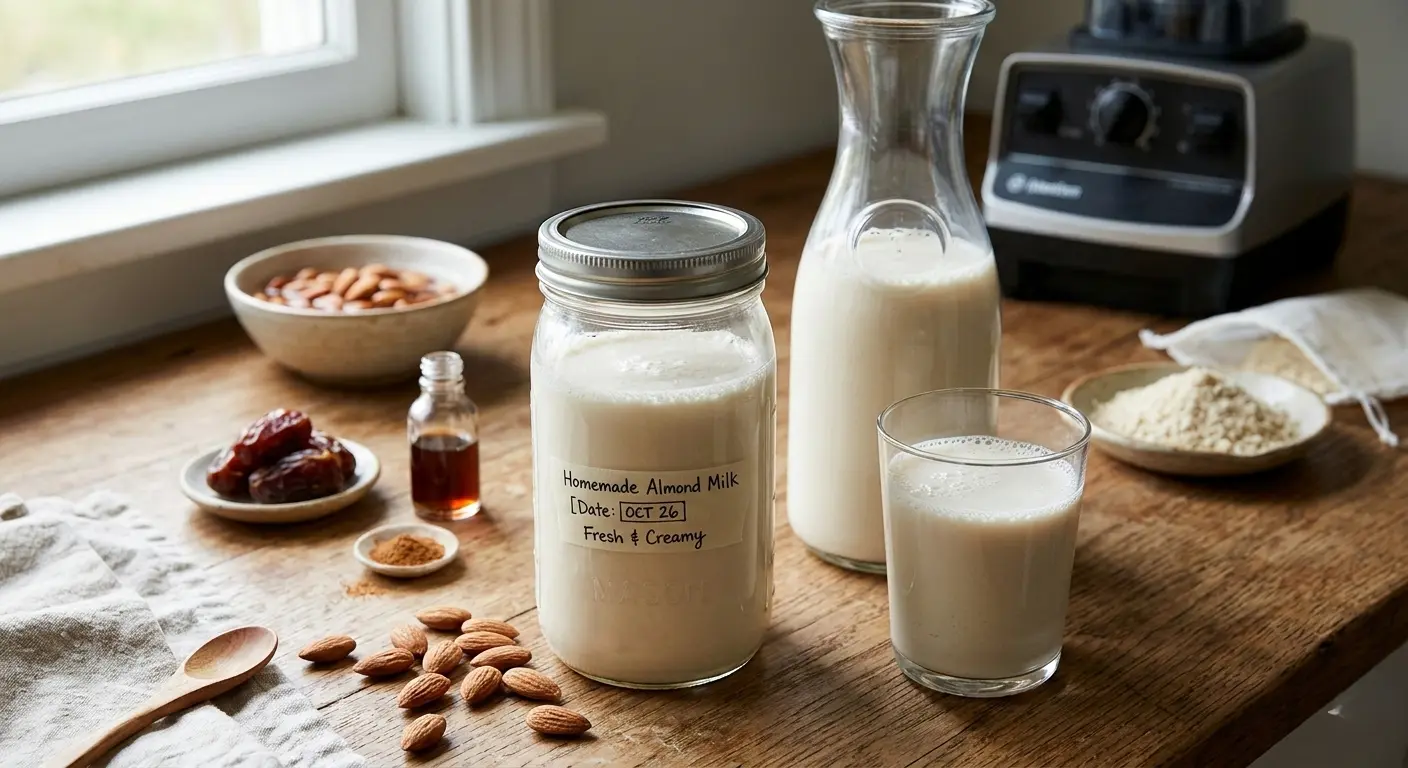
Step 6: Store Properly
Pour your finished almond milk into a clean glass jar or airtight bottle. Seal and refrigerate immediately. Homemade almond milk stays fresh for 4–5 days in the refrigerator. Because it contains no emulsifiers or stabilizers, it will naturally separate — this is completely normal and a sign of purity.
Simply shake or stir vigorously before each use. For the best flavor and quality, consume within 3 days of making.
💡 Pro Tip: Label your jar with the date made using a piece of masking tape. It’s easy to lose track when your fridge is full, and fresh almond milk at peak quality is worth protecting.
Nutritional Information
Homemade almond milk made with a 1:4 almond-to-water ratio provides a notably richer nutritional profile than most commercial varieties. Below is the approximate nutritional content per 1 cup (240ml) serving of unsweetened homemade almond milk:
| Nutrient | Per 1 Cup (240ml) | % Daily Value |
| Calories | 39 kcal | 2% |
| Total Fat | 2.5g | 3% |
| Saturated Fat | 0.2g | 1% |
| Carbohydrates | 3.4g | 1% |
| Dietary Fiber | 0.5g | 2% |
| Sugars | 2.1g | — |
| Protein | 1.5g | 3% |
| Calcium | 76mg | 6% |
| Vitamin E | 7.3mg | 49% |
| Magnesium | 17mg | 4% |
Homemade almond milk is an outstanding source of Vitamin E — a single cup provides nearly 49% of your recommended daily intake. Vitamin E is a powerful fat-soluble antioxidant that supports immune function, skin health, and cardiovascular protection. Compared to cow’s milk, homemade almond milk contains significantly fewer calories (39 vs. 149 per cup) and zero cholesterol, making it an excellent option for those managing weight, heart health, or dietary cholesterol intake.
Note: Because homemade almond milk is not fortified, it contains lower levels of calcium and Vitamin D than most commercial alternatives. If you rely on plant-based milk as a primary calcium source, consider pairing this recipe with other calcium-rich foods such as leafy greens, tofu, or fortified cereals.