Fire Cider Recipe
Fire Cider Recipe: The Ancient Immune-Boosting Tonic You Need This Winter
Ingredients: What Goes Into a Classic Fire Cider Recipe
The beauty of a fire cider recipe lies in its flexibility. The base ingredients are time-honored and research-backed, but this tonic is designed to be customized. Here’s what you’ll need for one standard quart-jar batch (approximately 32 servings):
🔥 Core Ingredients
- 1/2 cup fresh horseradish root, peeled and grated — pungent, sinus-clearing, and rich in glucosinolates
- 1/4 cup fresh ginger root, peeled and grated — warming, anti-nausea, and anti-inflammatory (gingerols & shogaols)
- 1/4 cup white or yellow onion, roughly chopped — prebiotic, rich in quercetin
- 8–10 cloves fresh garlic, smashed — potent source of allicin, nature’s antibiotic
- 2–3 fresh hot peppers (jalapeño, serrano, or habanero), sliced — capsaicin boosts circulation and metabolism
- 1 organic lemon, zested and juiced — vitamin C powerhouse
- 2–3 tablespoons raw honey (add after straining) — antimicrobial and soothing
- Raw, unfiltered apple cider vinegar with ‘the mother’ — enough to fill the jar (approximately 2–3 cups)
🌿 Optional Add-Ins (Highly Recommended)
- 1 tablespoon black peppercorns — enhances bioavailability of other compounds
- 1 teaspoon turmeric powder or 2 tablespoons fresh turmeric root — curcumin’s anti-inflammatory magic
- A few sprigs of fresh rosemary or thyme — antiviral properties
- 1/2 orange, sliced (peel on) — adds sweetness and bioflavonoids
- 1 tablespoon prepared horseradish sauce (as a shortcut substitute if fresh is unavailable)
🔄 Substitutions & Dietary Notes
Vegan? Skip the honey and substitute with maple syrup or agave nectar. Can’t handle the heat? Reduce the hot peppers and increase ginger. No fresh horseradish? Prepared horseradish (without cream) works in a pinch, though the flavor will be slightly milder.
Timing: Patience Is the Secret Ingredient
Unlike most recipes that come together in under an hour, a truly exceptional fire cider recipe requires patience. Here’s how the timeline breaks down:
| ⏱ Prep Time | ⏳ Infusion Time | ⏰ Total Time |
| 20 minutes | 3–4 weeks | 3–4 weeks + 20 min |
The 3–4 week infusion time might seem long, but here’s some perspective: that’s actually 50% shorter than some traditional vinegar herbal extracts, which can infuse for 6–8 weeks. The cold infusion method (no heat applied) preserves delicate volatile oils and enzymes in the raw ingredients — especially important for allicin in garlic, which degrades rapidly with heat.
Active hands-on time? Just 20 minutes. The rest is the vinegar doing its work.
Step-by-Step Instructions: How to Make Fire Cider Recipe at Home
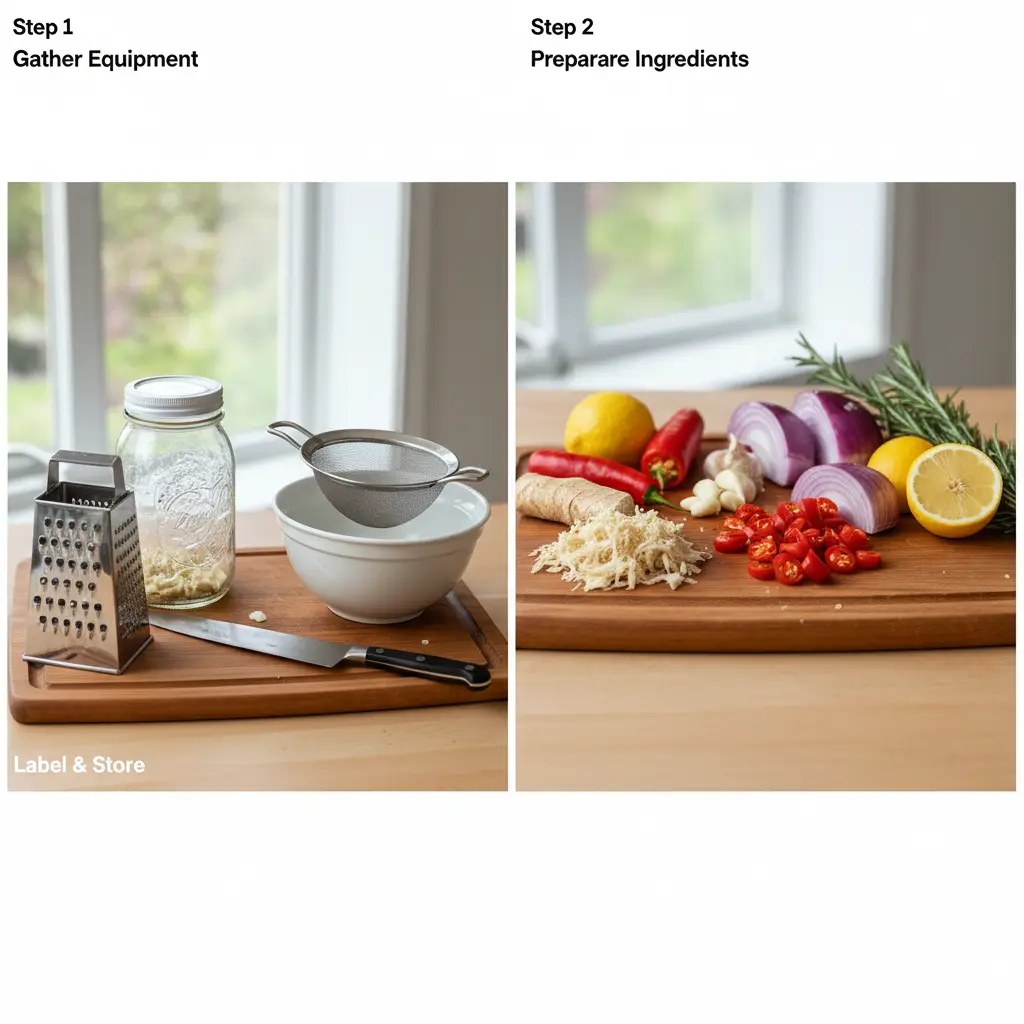
Step 1: Gather and Prep Your Equipment
Before you begin, assemble everything you need: a 1-quart wide-mouth glass mason jar with a plastic lid (or place parchment paper between the jar and metal lid to prevent corrosion from the acid), a fine-mesh strainer or cheesecloth, a large bowl, a sharp knife, cutting board, and grater or food processor.
💡 Pro Tip: Use plastic lids for fermenting and infusing with acidic liquids like ACV. Metal lids will corrode over time and may affect the flavor of your fire cider.
Step 2: Prepare the Fresh Ingredients
Wash all produce thoroughly under cold water. Peel and grate the horseradish root (wear gloves — it’s more potent than wasabi and will irritate your eyes and skin). Peel and grate or mince the ginger. Smash the garlic cloves with the flat of your knife and remove the paper skins. Roughly chop the onion into half-inch chunks. Slice the hot peppers into rounds, keeping the seeds for maximum heat. Zest and juice the lemon.
💡 Pro Tip: Grate the horseradish last, and do it near an open window or with ventilation. The volatile isothiocyanates released during grating are powerful respiratory irritants — something many herbalists consider a bonus feature of the tonic itself!
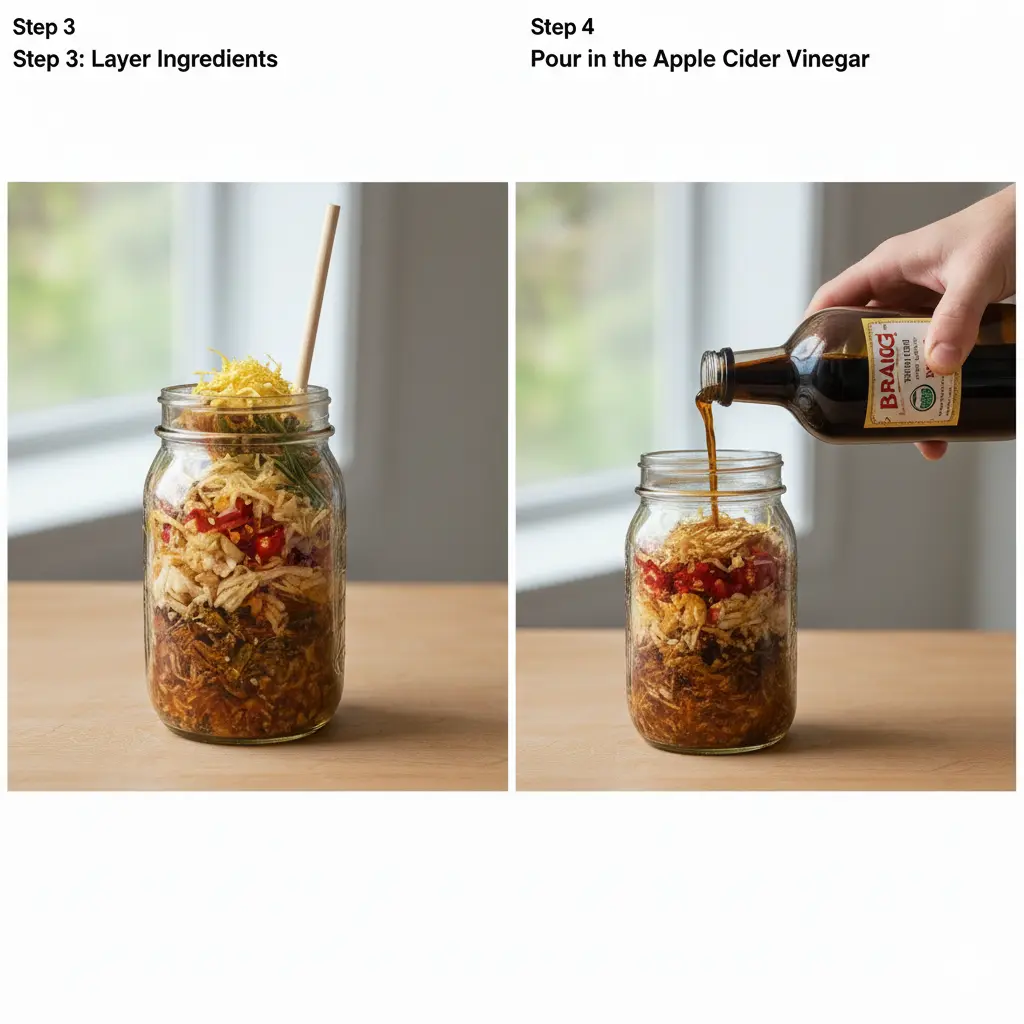
Step 3: Layer Ingredients into the Mason Jar
Pack all your prepared ingredients into the clean, dry mason jar. There’s no specific order required, but layering them creates an attractive visual if you’re gifting this tonic. Add the horseradish and ginger first (heaviest grated materials), then the garlic, onion, and peppers, followed by the lemon zest, juice, and any optional add-ins like turmeric, rosemary, or peppercorns.
💡 Pro Tip: Fill the jar to about 3/4 capacity with solid ingredients before adding liquid. This ensures a proper herb-to-vinegar ratio for a potent final product.
Step 4: Pour in the Apple Cider Vinegar
Pour raw, unfiltered apple cider vinegar (with ‘the mother’) over all the ingredients until the jar is filled to within half an inch of the rim. It’s critical to use ACV with the mother — this living culture of beneficial bacteria and enzymes is part of what makes fire cider so gut-friendly. Bragg Organic ACV is a widely available and reliable choice, but any raw, unfiltered variety works.
Use a clean chopstick or skewer to gently press down the ingredients and release any trapped air bubbles. Seal the jar tightly.
💡 Pro Tip: Make sure all plant material is submerged below the vinegar line to prevent mold growth. Top off with more ACV if needed.
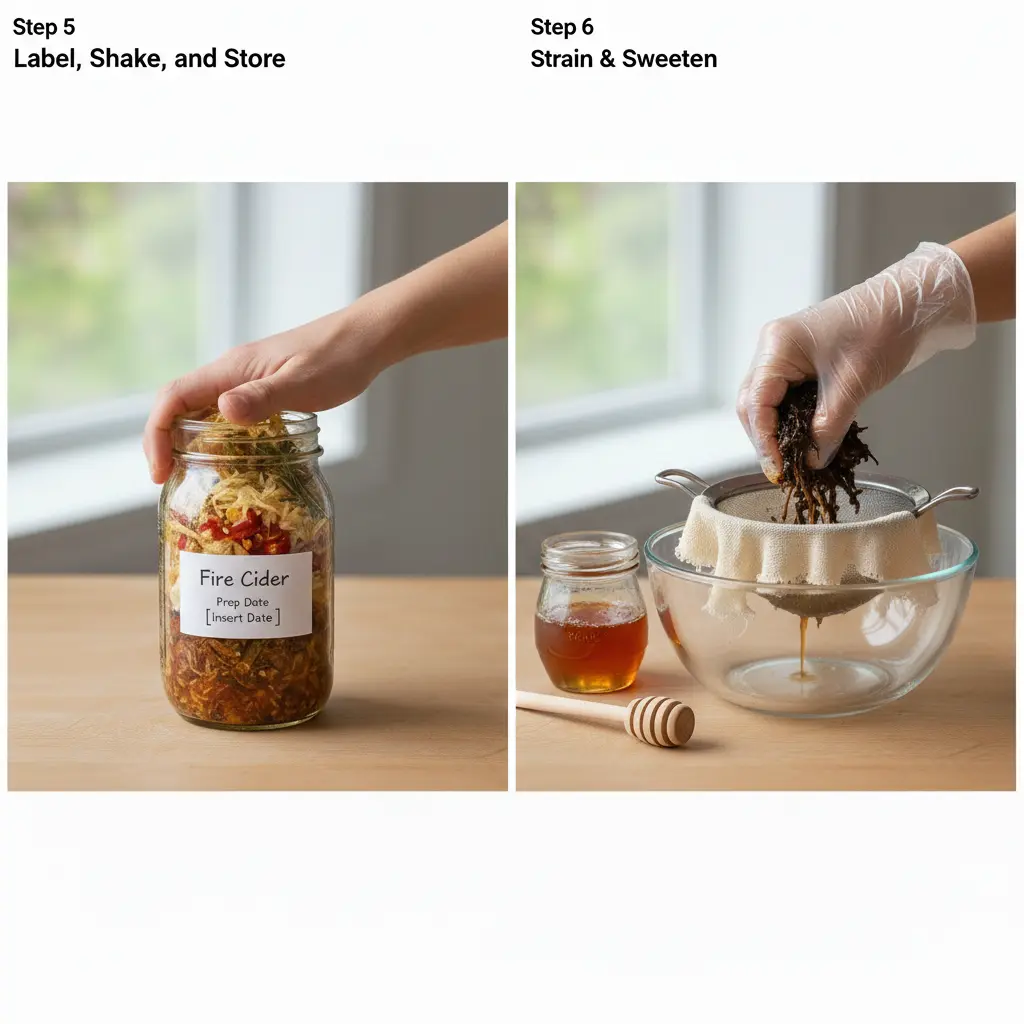
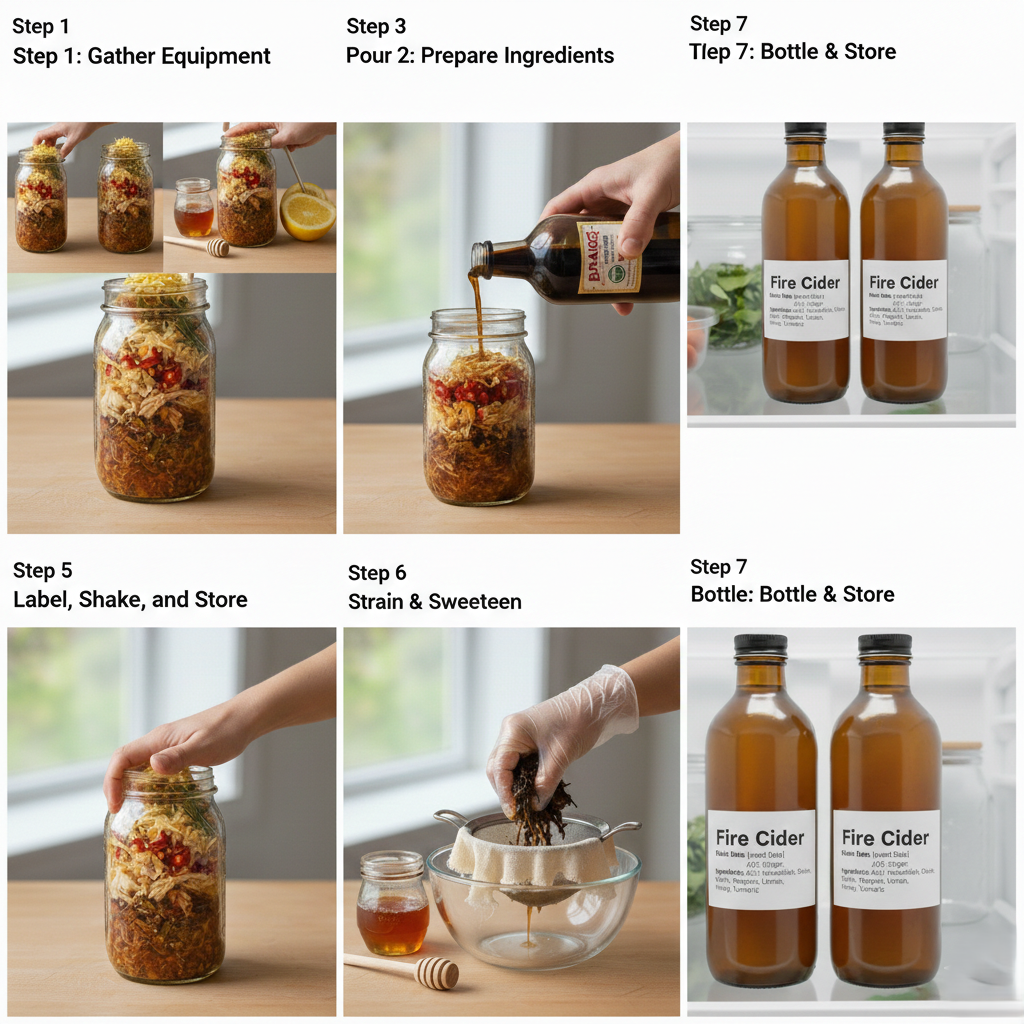
Step 5: Label, Shake, and Store
Write the preparation date on a piece of masking tape and stick it to the jar. Store in a cool, dark location — a kitchen cabinet away from the stove works perfectly. For the first week, shake the jar once or twice daily to redistribute the ingredients and encourage infusion. After the first week, you can shake it every few days.
💡 Pro Tip: Some herbalists prefer to keep fire cider in the refrigerator during infusion, particularly in warm climates. This slows infusion slightly but reduces any risk of fermentation going too far.
Step 6: Strain and Sweeten (After 3–4 Weeks)
After a minimum of 3 weeks (4 weeks for a more robust flavor), it’s time to strain your fire cider. Set a fine-mesh strainer lined with cheesecloth over a large bowl or pitcher. Pour the contents of the jar through the strainer. Use clean hands or the back of a spoon to squeeze every last drop of liquid from the spent herbs — this is liquid gold.
Discard the spent herbs (or add them to a stir-fry for a flavor boost!). Taste the strained liquid. Now add raw honey, starting with 2 tablespoons and adjusting to taste. Stir until fully dissolved. The honey balances the intensity and adds antimicrobial properties.
💡 Pro Tip: Don’t skip the sweetener. Without honey, fire cider is brutally sharp and difficult to take consistently. The sweet-heat balance is what makes it actually enjoyable as a daily tonic.
Step 7: Bottle and Store Your Finished Fire Cider
Pour the finished fire cider into clean glass bottles with tight-fitting lids. Amber glass bottles help protect the bioactive compounds from light degradation. Label with the strain date and ingredients. Store in the refrigerator for up to 12 months — though the flavor peaks in the first 6 months.
Nutritional Information: What’s Actually in Your Fire Cider?
Fire cider isn’t a meal replacement, but it is a concentrated functional food. The nutritional profile per standard 1 tablespoon (15ml) serving is modest in macros but rich in bioactive compounds:
| Nutrient | Per 1 tbsp (15ml) Serving |
| Calories | ~15 kcal |
| Carbohydrates | 3g |
| Sugars | 2g |
| Protein | 0.3g |
| Fat | 0g |
| Sodium | 5mg |
| Vitamin C | ~8% DV |
| Allicin (Garlic) | High |
| Gingerols (Ginger) | High |
| Capsaicin (Horseradish/Chili) | Present |