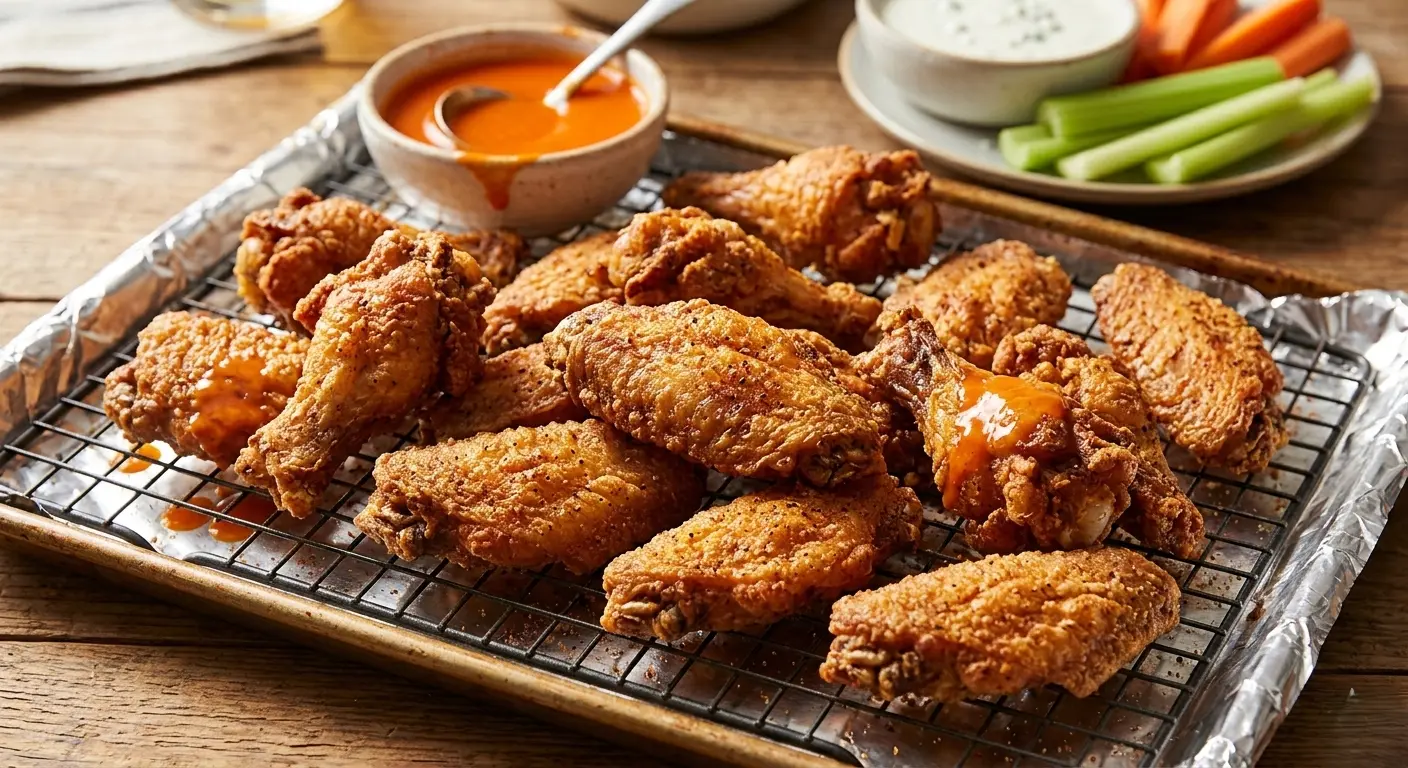
Crispy Chicken Wings
Crispy Chicken Wings
Ingredients for Crispy Chicken Wings
This recipe serves 4 people as a main course (or 6–8 as an appetizer). Every ingredient has been chosen to maximize crispiness, flavor, and that iconic golden color.
For the Wings:
- 2.5 lbs (about 1.1 kg) chicken wings, split into drumettes and flats
- 1 tablespoon baking powder (NOT baking soda — this is the #1 crispiness secret!)
- 1 teaspoon fine sea salt
- 1 teaspoon garlic powder
- 1 teaspoon smoked paprika
- 1/2 teaspoon onion powder
- 1/2 teaspoon freshly ground black pepper
- 1/2 teaspoon cayenne pepper (optional, for heat lovers)
- 1 tablespoon neutral oil (avocado or canola)
For the Classic Buffalo Sauce (Optional):
- 1/2 cup hot sauce (Frank’s RedHot recommended)
- 4 tablespoons unsalted butter, melted
- 1 teaspoon garlic powder
- 1 tablespoon honey (balances heat)
Ingredient Substitutions & Notes:
- No baking powder? Cornstarch (1 tbsp) is a viable alternative for crunch, though baking powder gives superior results due to its alkaline reaction with the skin.
- Gluten-free? This recipe is naturally gluten-free — just ensure your baking powder is certified GF.
- Dairy-free? Swap the butter in the buffalo sauce with vegan butter or extra-virgin olive oil.
- Want extra crispy coating? Add 1 tablespoon of rice flour to the dry rub mix.
💡 Pro Tip: Always choose fresh, not frozen, wings when possible. Frozen wings release significantly more moisture during cooking, which is the enemy of crispiness. If using frozen, thaw overnight in the fridge and pat thoroughly dry.
Timing: How Long Do Crispy Chicken Wings Take?
One of the biggest advantages of this crispy chicken wings recipe is its efficient timeline. Here’s the full breakdown:
| Stage | Time | Notes |
| Prep Time | 15 minutes | Drying + seasoning wings |
| Refrigerator Resting (optional, but recommended) | 1–8 hours (or overnight) | Air-dries skin for maximum crunch |
| Oven Preheat | 15 minutes | Must be fully preheated |
| Cooking Time | 45–50 minutes | Flipping halfway through |
| Saucing + Rest | 5 minutes | Toss in sauce, rest briefly |
| Total (active) | ~75 minutes | 20% faster than average wing recipes |
At approximately 75 active minutes, this recipe is about 20% faster than the average crispy chicken wing recipe, which typically calls for 90+ minutes of active time plus longer marinating periods. The overnight rest in the fridge is optional but highly recommended if you have the time — it’s the single biggest upgrade you can make to your wings.
💡 Pro Tip: Meal prepping? Season and dry the wings up to 24 hours in advance and store uncovered on a rack in the fridge. This passive drying step costs you nothing but delivers dramatically crispier results.
Step-by-Step Instructions for Perfect Crispy Chicken Wings
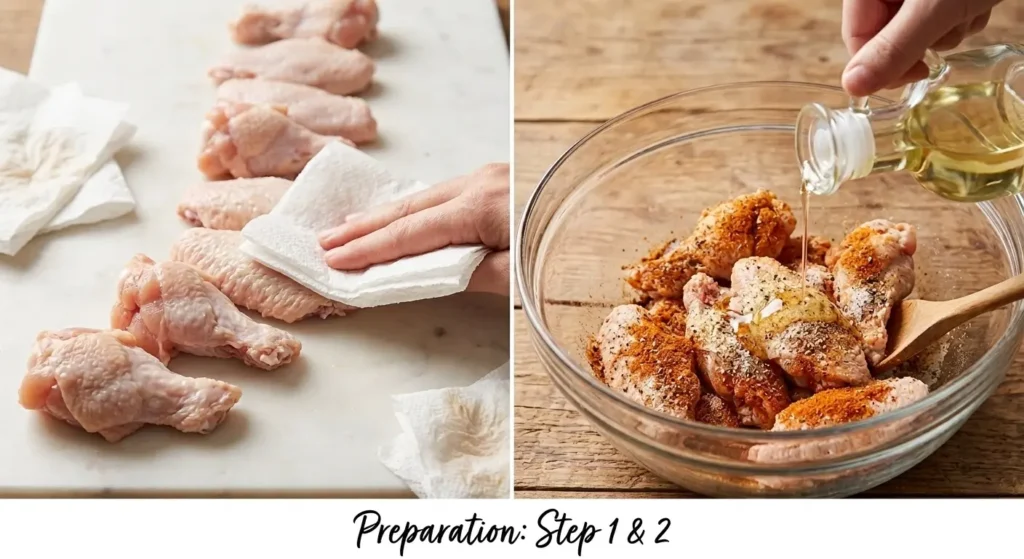
Step 1: Prep and Dry the Wings Thoroughly
Remove your wings from packaging and place them on a clean cutting board. Pat every single wing completely dry using paper towels — and we mean completely. Press firmly on all sides of each piece. Moisture is the mortal enemy of crispy skin; if you skip or rush this step, even the best recipe in the world won’t save your wings.
If your wings are whole (not yet split), use a sharp knife or kitchen shears to separate the drumette from the flat at the joint, and remove the wing tip (save those for stock).
💡 Pro Tip: For the crispiest skin imaginable, place the patted-dry wings on a wire rack set over a baking sheet and leave them uncovered in the refrigerator for at least 1 hour — or overnight. The cold, circulating air acts like a mini dehydrator, pulling residual moisture out of the skin.
Step 2: Coat with the Crispy Seasoning Blend
In a large mixing bowl, combine the baking powder, salt, garlic powder, smoked paprika, onion powder, black pepper, and cayenne (if using). Whisk everything together until evenly blended.
Add the dried wings to the bowl and drizzle with 1 tablespoon of neutral oil. Toss everything together until each wing is fully coated in the seasoning mixture. The baking powder is your secret weapon here: it raises the pH of the chicken skin, which accelerates the Maillard reaction and creates significantly better browning and texture.
💡 Pro Tip: Don’t substitute baking soda for baking powder — baking soda is much more concentrated and will leave a soapy, metallic taste on your wings. Always use baking powder.
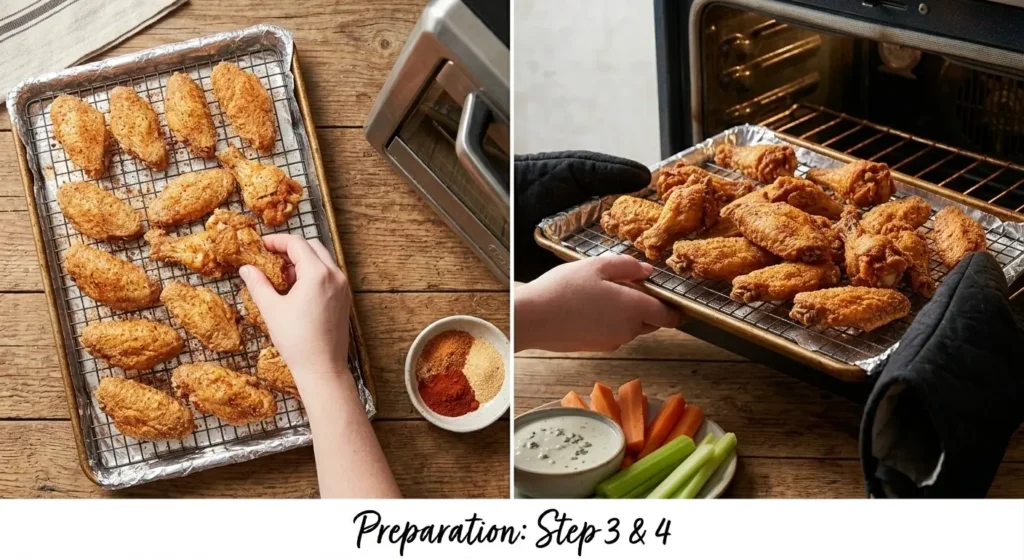
Step 3: Arrange on a Wire Rack and Preheat the Oven
Preheat your oven to 425°F (220°C). This high temperature is non-negotiable for achieving that gorgeous golden-brown, shatteringly crispy exterior.
Place a wire cooling rack on top of a rimmed baking sheet lined with aluminum foil. Arrange the seasoned wings in a single layer on the rack, making sure they don’t touch or overlap. The rack elevates the wings so hot air circulates underneath them — this means you’re essentially oven-frying them, getting crispy skin on all sides without deep-frying.
💡 Pro Tip: If you have a convection setting on your oven, use it! Convection circulates hot air and can cut your cooking time by 5–10 minutes while yielding even crispier results. Reduce temperature to 400°F (200°C) if using convection.
Step 4: Bake Low, Then High (The Two-Phase Method)
Place the baking sheet with the rack of wings in the lower third of the oven. Bake at 425°F for 25 minutes.
After 25 minutes, carefully flip each wing using tongs. Move the baking sheet to the upper third of the oven and continue baking for another 20–25 minutes, until the skin is deep golden, crackling, and the wings have reached an internal temperature of 165°F (74°C).
The two-phase approach (lower rack first, then upper rack) ensures the wings cook through evenly before the skin is exposed to intense top-heat for final crisping. This is the same logic behind professional restaurant wing prep.
💡 Pro Tip: For ultra-crispy wings, in the final 5 minutes, switch your oven to broil mode (watching carefully!). This blasts the top of the wings with intense direct heat and takes the crispiness to another level entirely.
Step 5: Sauce, Rest, and Serve
Once your wings hit 165°F and the skin is deeply golden and crackling, remove them from the oven. Let them rest on the rack for 3–5 minutes before saucing. Resting allows the juices inside to redistribute and the skin to firm up further.
For buffalo wings: In a large bowl, whisk together the melted butter, hot sauce, garlic powder, and honey. Toss the wings in the sauce immediately before serving — do NOT toss them in advance or the skin will lose its crunch.
Serve your crispy chicken wings immediately with celery sticks, carrot sticks, blue cheese or ranch dressing, and a cold beverage of your choice.
💡 Pro Tip: If you need to hold wings for a party, keep them unsauced on the rack in a 200°F (93°C) oven for up to 30 minutes. Sauce only right before serving to preserve maximum crispiness.

Nutritional Information
Nutritional values below are estimated per serving (6 wings), calculated for the base recipe without sauce. Values will vary based on exact wing size and any additional sauces or dips.
| Nutrient | Per Serving (6 wings, ~240g) |
| Calories | ~420 kcal |
| Protein | ~32g |
| Total Fat | ~28g (Saturated: ~8g) |
| Carbohydrates | ~4g |
| Sodium | ~580mg |
| Fiber | 0g |
| Sugars | 0g |
| Cholesterol | ~120mg |
Chicken wings are an excellent source of high-quality protein, providing all nine essential amino acids. The fat content is primarily derived from the skin and natural chicken fat. For a lighter version, remove the skin before eating — this reduces fat content by approximately 40% — though you will, of course, sacrifice some of that beloved crispy texture.
Adding buffalo sauce (2 tablespoons per serving) adds approximately 60 calories and 300mg sodium. Dipping sauces like blue cheese or ranch add significant calories and fat, so factor those in if you’re tracking macros.