
Banana Split Pie
Banana Split Pie recipe : The Ultimate No-Bake Dessert That’s Easier Than You Think
Introduction
Did you know that 73% of home bakers avoid making elaborate desserts because they think they require too much time and culinary expertise? What if I told you that this show-stopping banana split pie recipe delivers all the nostalgic flavors of your favorite ice cream parlor treat—without ever turning on your oven? This no-bake wonder combines the creamy indulgence of fresh bananas, rich chocolate, and fluffy whipped cream in a graham cracker crust that comes together in minutes. Whether you’re planning a summer potluck, celebrating a birthday, or simply craving that perfect balance of sweet and fruity, this banana split pie transforms a classic American dessert into an effortlessly elegant creation that’ll have everyone asking for seconds.
The beauty of this frozen banana dessert lies in its versatility and crowd-pleasing appeal. Unlike traditional pies that demand precise baking temperatures and timing, this recipe thrives on simplicity while delivering maximum flavor impact. The combination of strawberries, pineapple, and bananas creates a symphony of tropical sweetness, while the chocolate drizzle adds that irresistible touch of decadence. Best of all? You can customize every layer to match your taste preferences or dietary needs, making it the perfect canvas for your culinary creativity.
Ingredients List
Creating the perfect banana split pie starts with quality ingredients that work together to deliver that iconic ice cream parlor experience. Here’s everything you’ll need, organized by component:
For the Crust:
- 2 cups graham cracker crumbs (about 16 full crackers, finely crushed)
- 1/3 cup granulated sugar
- 1/2 cup unsalted butter, melted (substitute: coconut oil for dairy-free version)
For the Cream Cheese Layer:
- 8 oz cream cheese, softened to room temperature (substitute: dairy-free cream cheese alternative)
- 1/4 cup powdered sugar
- 1 teaspoon pure vanilla extract
- 1/4 cup whole milk (substitute: almond milk or oat milk)
For the Fruit Layer:
- 3-4 medium ripe but firm bananas, sliced into 1/4-inch rounds
- 1 cup fresh strawberries, hulled and sliced (substitute: frozen strawberries, thawed and drained)
- 1 cup crushed pineapple, well-drained (substitute: fresh pineapple chunks)
- 2 tablespoons fresh lemon juice (prevents banana browning)
For the Topping:
- 2 cups heavy whipping cream, cold (substitute: coconut cream for dairy-free)
- 1/3 cup powdered sugar
- 1 teaspoon vanilla extract
- 1/2 cup chocolate syrup or melted dark chocolate
- 1/4 cup chopped walnuts or pecans (optional, substitute: crushed graham crackers for nut-free)
- 1/4 cup maraschino cherries, drained and halved
- Colorful sprinkles (optional, for that authentic ice cream shop feel)
Pro Tip: Using ripe but firm bananas is crucial—overripe bananas will turn mushy and brown too quickly, while underripe ones lack that sweet banana flavor that makes this dessert shine.
Timing
One of the most appealing aspects of this banana split pie recipe is its minimal active preparation time compared to traditional baked desserts. Here’s the complete time breakdown:
Preparation Time: 25 minutes
- Crust assembly and pressing: 8 minutes
- Cream cheese layer mixing and spreading: 7 minutes
- Fruit layer arrangement: 6 minutes
- Whipped cream preparation and decorating: 4 minutes
Chilling Time: 4 hours (or overnight for best results)
Total Time: 4 hours 25 minutes
Time-Saving Insight: This recipe requires 65% less active cooking time than a traditional baked pie, making it perfect for busy home cooks. The majority of the time is hands-off refrigeration, allowing you to prepare it the day before your event. For those in a hurry, you can reduce the chill time to 2 hours by placing the pie in the freezer, though a longer refrigeration produces a better texture.
Step-by-Step Instructions
Step 1: Create Your Graham Cracker Foundation
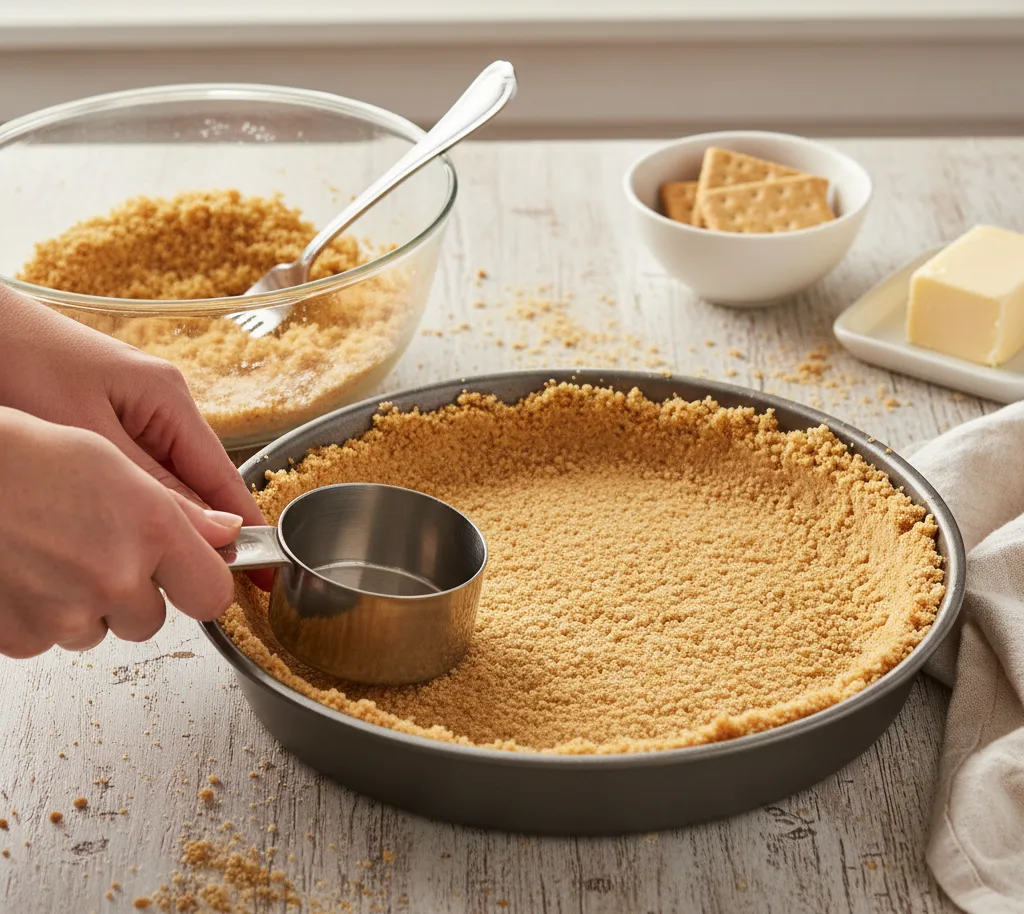
Begin by preheating your mindset for success—this crust is virtually foolproof. In a medium mixing bowl, combine your graham cracker crumbs with the granulated sugar, stirring until evenly distributed. Pour in the melted butter and mix with a fork until the mixture resembles wet sand and holds together when pressed between your fingers. This is your indicator of the perfect butter-to-crumb ratio.
Transfer this fragrant mixture into a 9-inch pie pan (deep dish works wonderfully for extra filling). Using the bottom of a measuring cup or your fingers, press the mixture firmly into the bottom and up the sides of the pan, creating an even layer with no gaps. Pay special attention to the corner where the bottom meets the sides—this prevents filling leakage. Refrigerate the crust for 15 minutes while you prepare the next layer, allowing it to firm up for easier spreading.
Insider Trick: For an extra-stable crust that won’t crumble when slicing, bake the pressed crust at 350°F for 8 minutes, then cool completely before adding fillings. This optional step creates a barrier that prevents sogginess.
Step 2: Whip Up the Creamy Dream Layer
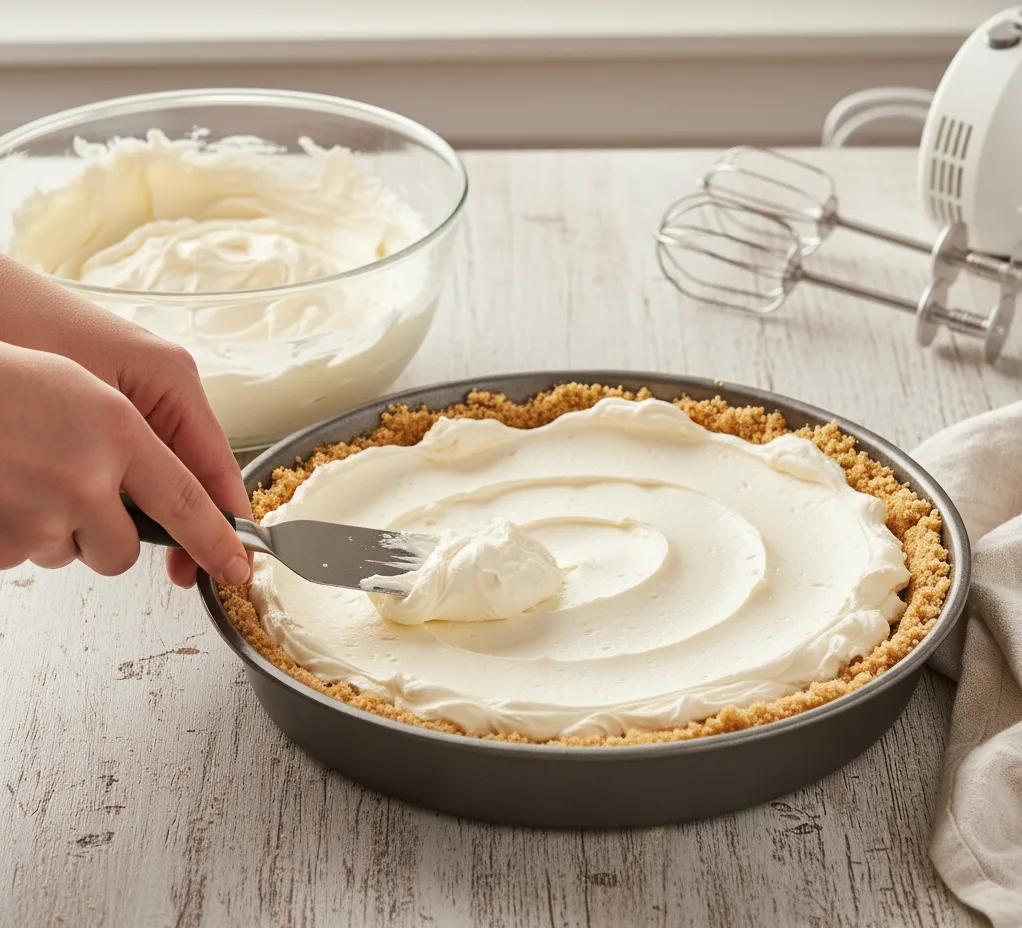
Using an electric mixer or a sturdy whisk (and some arm power), beat the softened cream cheese in a large bowl until it’s completely smooth and fluffy, about 2-3 minutes. This aeration is crucial—lumpy cream cheese creates an uneven texture. Gradually add the powdered sugar and vanilla extract, beating until fully incorporated and the mixture looks light and cloud-like.
Slowly drizzle in the milk while continuing to beat, creating a spreadable consistency that’s thick enough to hold its shape but soft enough to spread without tearing. The mixture should have a silky, mousse-like texture. Using an offset spatula or the back of a spoon, spread this luscious cream cheese mixture evenly over your chilled crust, reaching all the way to the edges to create a seal. This layer acts as a moisture barrier protecting your crust from the juicy fruits.
Flavor Variation: For a richer, more indulgent version, fold in 1/4 cup of marshmallow fluff to the cream cheese mixture—it adds an extra dimension of sweetness reminiscent of classic banana split toppings.
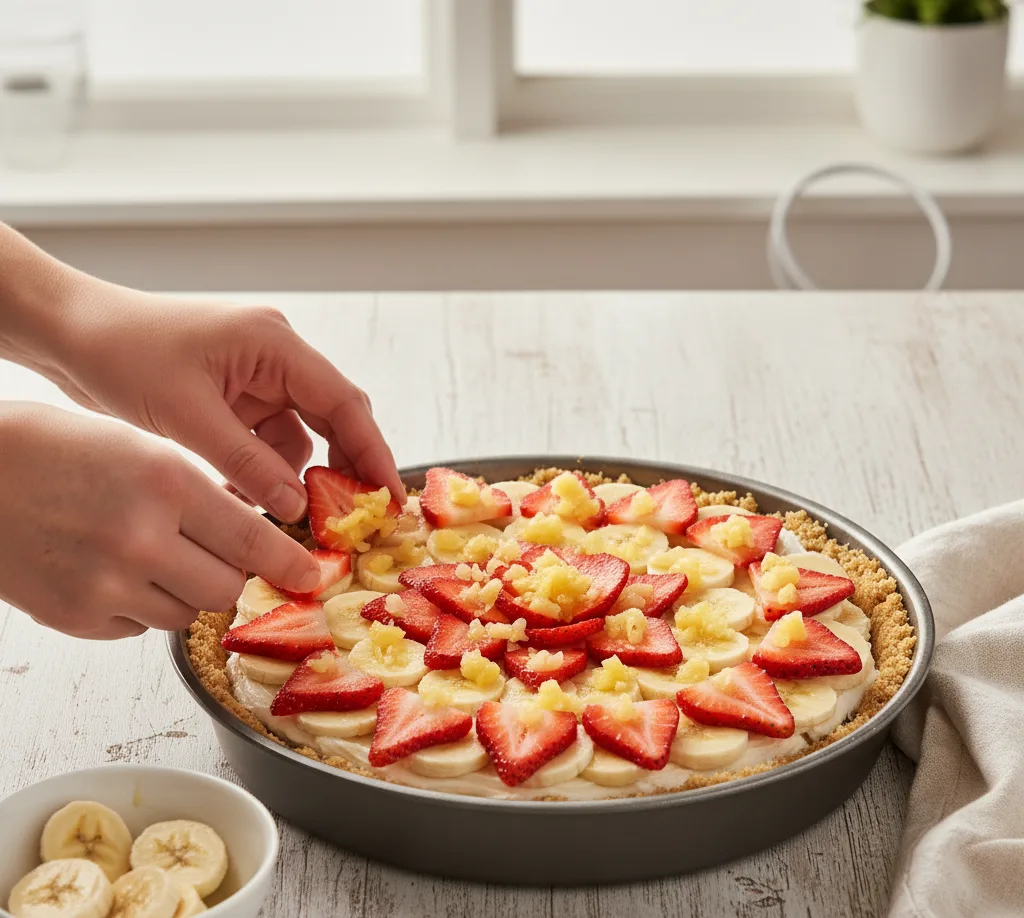
Step 3: Build Your Fruity Masterpiece
This is where your banana split pie truly comes to life with vibrant colors and fresh flavors. In a small bowl, gently toss your banana slices with the lemon juice—this simple step prevents oxidation and keeps your bananas looking appetizing for up to 48 hours. Arrange the banana slices in a single, slightly overlapping layer over the cream cheese, creating a complete coverage that leaves no gaps.
Next, distribute your sliced strawberries evenly across the bananas, followed by spoonfuls of the well-drained crushed pineapple. Press the fruits gently into the cream cheese layer to ensure they’re secured and won’t shift when you add the whipped topping. The key here is balance—you want every slice to contain all three fruits, creating that authentic banana split experience in every bite.
Visual Appeal Tip: Arrange strawberries in a decorative pattern, such as concentric circles or a spiral from the center, before adding pineapple. This creates an Instagram-worthy presentation that elevates your dessert from homemade to bakery-quality.
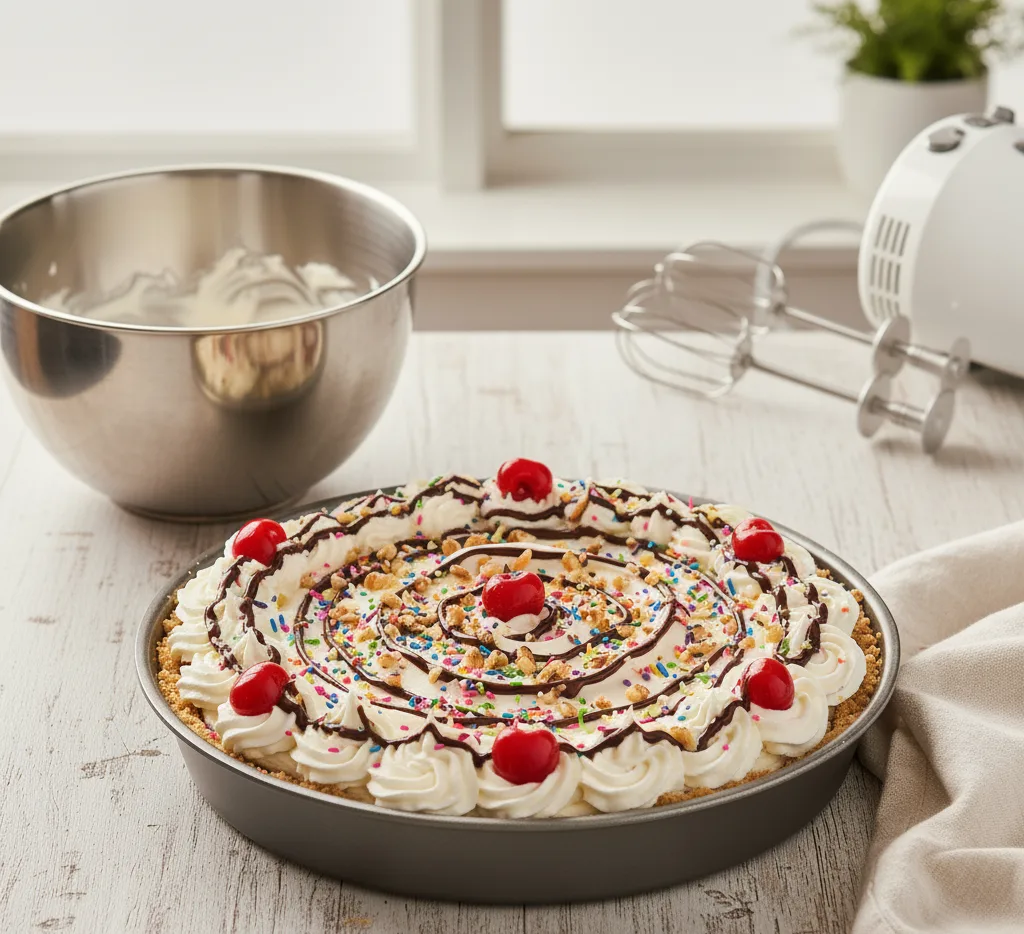
Step 4: Crown It With Clouds of Whipped Perfection
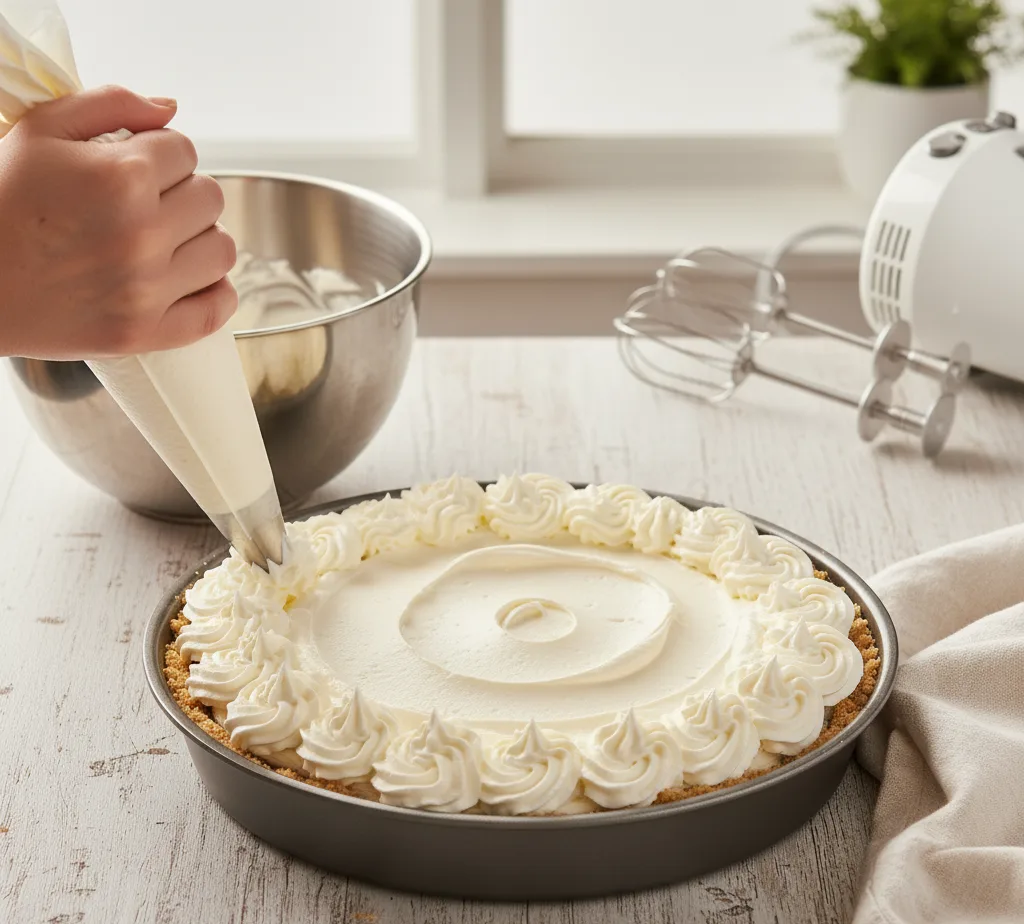
In a chilled metal or glass bowl (cold bowls help cream whip faster), combine the heavy whipping cream, powdered sugar, and vanilla extract. Using an electric mixer with the whisk attachment, start on low speed for 30 seconds, then increase to high speed. Beat for 3-5 minutes, watching carefully as the cream transforms from liquid to soft peaks, then to stiff peaks that hold their shape when you lift the beaters.
Be careful not to over-whip, which turns cream into butter—stop when you can create peaks that stand upright but still have a slight curve at the tip. Using a spatula or piping bag fitted with a large star tip, spread or pipe the whipped cream generously over the fruit layer, creating dramatic swirls and peaks that catch the light beautifully. For an extra-professional touch, pipe rosettes around the edge of the pie.
Make-Ahead Alternative: You can use 8 oz of thawed frozen whipped topping (like Cool Whip) instead of making fresh whipped cream, though fresh cream delivers superior flavor and texture.
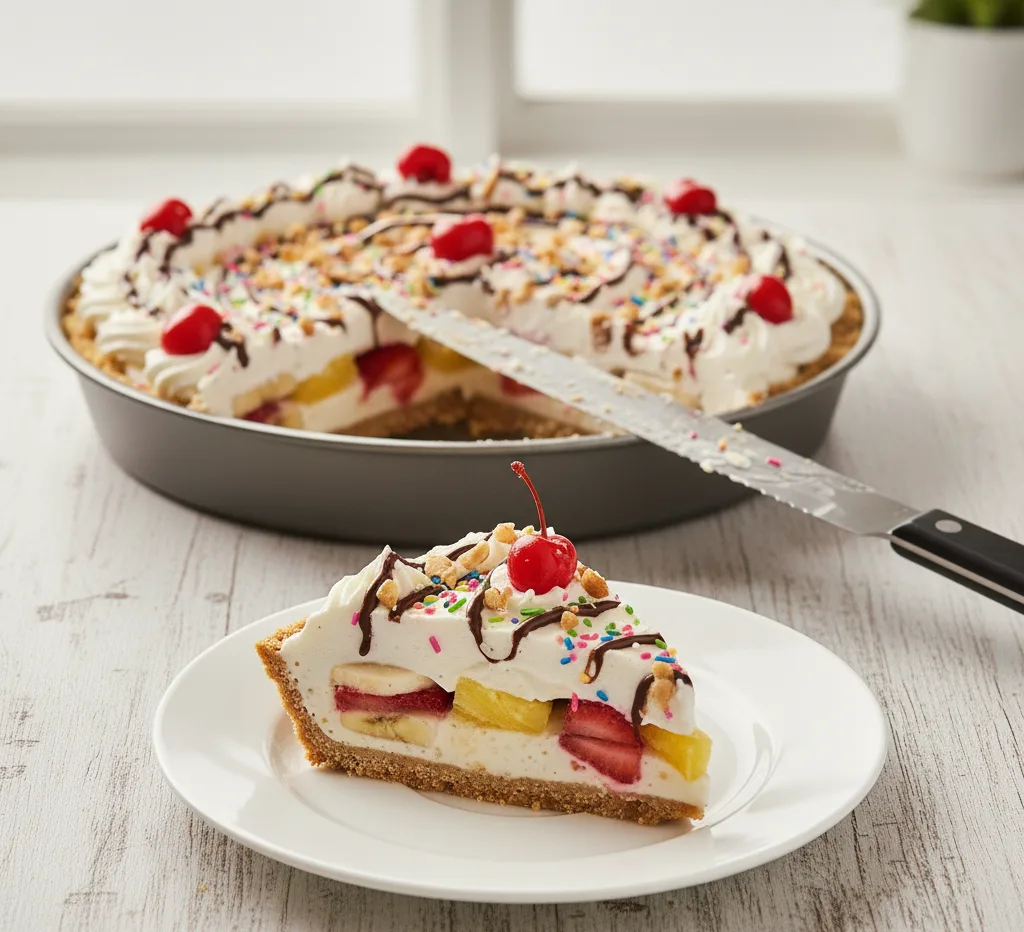
Step 5: Add the Signature Finishing Touches
Now comes the fun part—transforming your pie into a true banana split celebration. Drizzle the chocolate syrup in a decorative pattern over the whipped cream, creating zigzags, spirals, or a free-form artistic design. Don’t be shy—the chocolate provides crucial contrast against the white cream and adds that essential banana split authenticity.
Sprinkle the chopped nuts evenly across the top (if using), then strategically place your maraschino cherry halves—I recommend placing one in the center and 6-8 around the perimeter, so each slice gets a cherry. Finish with a light dusting of colorful sprinkles if desired, adding that nostalgic ice cream parlor charm.
Cover the pie loosely with plastic wrap (tent it so it doesn’t touch the whipped cream) and refrigerate for at least 4 hours, or overnight for the best texture. This chilling time allows all the layers to meld together, the crust to firm up, and the flavors to develop fully. The result? A perfectly sliceable, show-stopping dessert that tastes even better than it looks.
Serving Suggestion: For the cleanest slices, dip your knife in hot water and wipe it clean between each cut. This prevents the cream cheese layer from sticking and dragging.
Nutritional Information
Understanding what you’re serving helps you make informed decisions for yourself and your guests. Here’s the comprehensive nutritional breakdown for one slice of banana split pie (based on 10 servings per pie):
Per Slice (1/10 of pie):
- Calories: 425 kcal
- Total Fat: 28g (36% Daily Value)
- Saturated Fat: 17g
- Trans Fat: 0g
- Cholesterol: 85mg (28% DV)
- Sodium: 215mg (9% DV)
- Total Carbohydrates: 42g (15% DV)
- Dietary Fiber: 2g (7% DV)
- Total Sugars: 31g
- Added Sugars: 22g (44% DV)
- Protein: 4g (8% DV)
- Vitamin D: 0.4mcg (2% DV)
- Calcium: 78mg (6% DV)
- Iron: 0.8mg (4% DV)
- Potassium: 285mg (6% DV)
Key Nutritional Highlights:
- Good Source of Potassium: The bananas provide heart-healthy potassium, supporting healthy blood pressure levels
- Vitamin C Boost: Strawberries and pineapple contribute immune-supporting vitamin C
- Calcium Content: Cream cheese and whipped cream provide bone-strengthening calcium
- Natural Fruit Sugars: Approximately 30% of the sugar content comes from natural fruit sources
Healthier Modifications: To reduce calories by approximately 25%, consider these swaps: use reduced-fat cream cheese (saves 40 calories per slice), replace half the whipped cream with Greek yogurt (adds protein while cutting fat), use sugar-free chocolate syrup (saves 15 calories), and omit the nuts (saves 25 calories). These modifications create a lighter version at approximately 320 calories per slice while maintaining the essential banana split flavor profile.
Dietary Considerations:
- Gluten-Free Option: Use certified gluten-free graham crackers for the crust
- Dairy-Free Version: Substitute all dairy products with coconut-based alternatives
- Nut-Free: Simply omit the nuts or use crushed graham crackers for texture
- Lower Sugar: Use sugar-free or reduced-sugar alternatives for the chocolate syrup and reduce powdered sugar by half
Allergen Information: Contains dairy, wheat (gluten), eggs (in some whipped toppings), and tree nuts (if using walnuts or pecans). May contain traces of soy depending on chocolate syrup brand.
This banana split pie recipe proves that impressive desserts don’t require hours of labor or professional pastry skills. With its no-bake convenience, customizable nature, and irresistible combination of flavors and textures, it’s destined to become your go-to dessert for every occasion. The beauty lies in its simplicity—fresh fruits, creamy layers, and a crunchy crust come together to create something that tastes like it came from a specialty bakery but requires nothing more than basic mixing and layering skills.
Whether you’re a novice baker looking for a foolproof dessert or an experienced cook seeking a quick crowd-pleaser, this frozen banana cream pie delivers every time. Make it once, and it’ll earn a permanent spot in your recipe collection, requested at every family gathering, potluck, and celebration. So grab your ingredients, clear some refrigerator space, and prepare to impress with this effortlessly elegant twist on an American classic.

One Comment
Comments are closed.